Mazda CX-5 Service & Repair Manual: Airflow Mode Main Link Removal/Installation
Full-auto Air Conditioner
1. The airflow mode main link is installed to the airflow mode actuator. When removing the airflow mode main link, refer to the airflow mode actuator removal/installation..
Manual Air Conditioner
1. Disconnect the negative battery cable..
2. Remove the glove compartment..
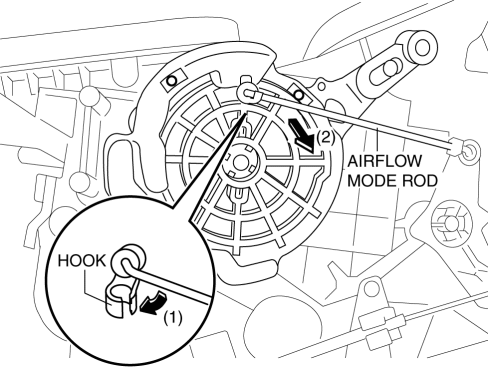
3. Detach the hook (1), then remove the airflow mode rod (2).
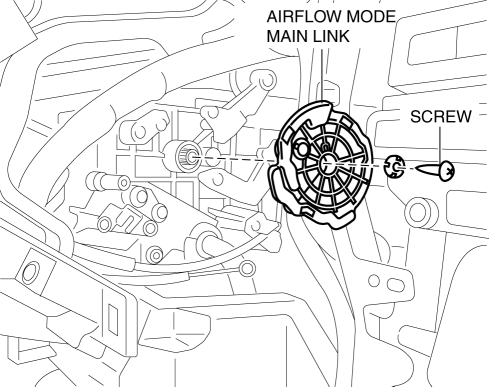
4. Remove the screw, then airflow mode main link.
5. Install in the reverse order of removal..
Airflow Mode Main Link Installation Note
CAUTION:
-
Apply only the specified grease to links. Otherwise abnormal noise or improper operation may result.
1. Align the airflow mode main link hole with the airflow mode sub link projection as shown in the figure.

2. Press the airflow mode main link lightly to the A/C unit, then set the projections of each airflow mode sub link into the grooves of the airflow mode main link.
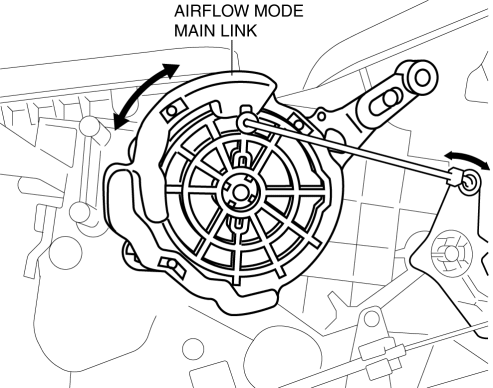
3. Rotate airflow mode main link and verify that each mode is accessed properly.
 Air Fuel Ratio (A/F) Sensor Heater Control [Skyactiv G 2.0]
Outline
Based on the control of the A/F sensor heater, a stabilized oxygen concentration
is detected even at low exhaust temperatures, and feedback control of fuel injection
even at cold ...
 Basic System
Outline
Integrated A/C unit adopted.
Sub-cooling system to multi-flow condenser adopted.
Structural View
Ventilation system
Refrigerant system
Flow Diagram
Ventila ...
Other materials:
Manual Transaxle Oil Inspection [C66 M R]
1. Park the vehicle on level ground.
2. Remove the front under cover No.2..
3. Remove the oil level plug and gasket.
4. Verify that the manual transaxle oil is near the brim of the plug port.
When the manual transaxle oil level is lower than the lower limit, add manual
transaxl ...
Front Parking Brake Cable Removal/Installation
1. Remove the front console box..
2. Remove the shift lever knob. (MTX).
3. Remove the shift panel..
4. Remove the upper panel..
5. Remove the rear console..
6. Remove in the order indicated in the table.
7. Install in the reverse order of removal.
8. After installation, inspect the pa ...
Front Door Latch And Lock Actuator Removal/Installation
1. Perform the front door glass preparation..
2. Disconnect the negative battery cable..
3. Remove the following parts:
a. Inner garnish.
b. Front door trim.
c. Inner handle.
d. Front door glass.
e. Front door module panel.
f. Front door key cylinder.
4. Remove the door lock knob c ...
