Mazda CX-5 Service & Repair Manual: Spark Plug Inspection [Skyactiv G 2.0]
Specification
-
Spark plug type
-
PE01-18110, PE02-18110
Plug Gap Inspection
CAUTION:
-
To avoid possible damage to the tip, do not adjust the plug gap.
-
To prevent damaging the tip, use a wire type plug gap gauge when inspecting the plug gap.
1. Measure the spark plug gap using a wire type plug gap gauge.
-
If not within the standard specification, replace the spark plug.
-
Spark plug gap
-
Standard: 0.75—1.10 mm {0.030—0.043 in}
-
New spark plug (reference): 0.75—0.85 mm {0.030—0.033 in}
Cleaning
CAUTION:
-
Carbon may adhere to the tip of the spark plug during vehicle delivery or repeated short distance driving during the winter time. If there is any malfunction such as rough idling or start difficulty due to carbon adhesion causing plug fouling, burn off the carbon by performing no-load racing of the engine.
-
When performing the no-load racing, apply the side brake and foot brake, move the shift lever to neutral (MTX), or the selector lever to P position (ATX) to prevent an accident and serious injury.
-
To avoid possible damage to the spark plug tip, do not use a wire brush for cleaning.
NOTE:
-
To avoid possible damage to the tip, use gasoline to clean the spark plugs after removing dirt.
-
If the accelerator pedal is depressed continuously for a specified time, the engine speed may decrease to the idle speed. This is due to the PCM control operation, which prevents overheating, and it does not indicate a malfunction.
-
Do not perform no-load racing at high engine speed continuously for 10 s or more
.
1. If there is carbon adhering to the spark plug, perform no-load racing at 4,000 rpm
for 2 min
, 2 times
.
Visual Inspection
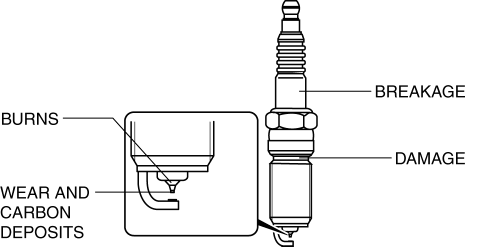
1. Inspect the following items:

-
If any of the following malfunctions are indicated, replace the spark plug.
-
Insulator breakage
-
Worn electrode
-
Damaged gasket
-
Badly burned insulator (sparking side)
Resistance Inspection
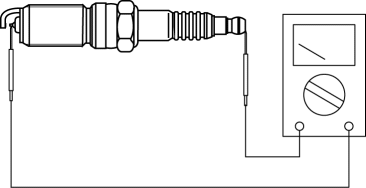
1. Measure the resistance of the spark plug using a tester as shown in the figure.

-
If not within specification, replace the spark plug.
-
Spark plug resistance [25°C {77 °F}]
-
3.0—7.5 kilohms
 Ignition System [Skyactiv G 2.0]
Outline
A direct ignition coil for independent ignition control has been adopted.
An ignition coil built-into the ion sensor has been adopted.
An iridium spark plug has been ado ...
 Spark Plug Removal/Installation [Skyactiv G 2.0]
CAUTION:
If a spark plug that is not as specified is installed, engine performance
will be deteriorated. Install only the specified spark plug when replacing.
1. Disconnect the negati ...
Other materials:
Ion Sensor
Purpose/Function
Detects ion generation in the combustion chamber for detecting pre-ignition.
Detects ions which occur due to fuel combustion as current by applying bias
voltage to the spark plug, which is amplified in the ignition coil internal
circuit and input to the PCM.
...
Crankshaft Position (CKP) Sensor Inspection
Visual Inspection
CAUTION:
When foreign material such as an iron chip is on the CKP sensor, it can cause
abnormal output from the sensor because of flux turbulence and adversely affect
the engine control. Be sure there is no foreign material on the CKP sensor when
replacing.
...
Front Fog Lights Indicator Light
Purpose
Notifies the user that the front fog lights are illuminated.
Function
Illuminates when the front fog light illumination conditions are met.
Construction
Displayed in the instrument cluster.
Operation
1. With the light switch in the TNS, HEAD, or ...
