Mazda CX-5 Service & Repair Manual: Key Cylinder Switch
Purpose
-
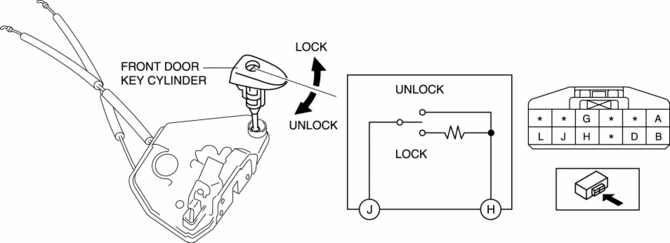
The switch turns on/off in conjunction with the front door key cylinder lock/unlock and the rear body control module (RBCM) detects the key cylinder operation condition by the change in the voltage.
Function
-
The key cylinder switch contact point changes in conjunction with the front door key cylinder lock/unlock operation.
Construction
-
Built into the driver's side front door latch and lock actuator.
-
The front door key cylinder is connected to the front door latch and lock actuator, and the front door key cylinder is rotated to directly switch the key cylinder switch.
-
When the front door key cylinder is not operated, the key cylinder switch is off (contact point: Open).
Operation
Lock operation
-
When the key is inserted in the front door key cylinder and it is rotated in the lock direction, the key cylinder switch switches to the lock side, and the lock-side switch turns on (contact point: Closed).
Unlock operation
-
When the key is inserted in the front door key cylinder and it is rotated in the unlock direction, the key cylinder switch switches to the unlock side, and the unlock-side switch turns on (contact point: Closed).
Fail-safe
-
Function not equipped.
 Front Door Key Cylinder Switch Inspection
1. Perform the front door glass preparation..
2. Disconnect the negative battery cable..
3. Remove the following parts:
a. Inner garnish.
b. Front door trim.
c. Front door key cylinder.
d. ...
 Storage
...
Other materials:
Outer Mirror Glass Installation
1. Connect the mirror heater connectors. (with heated outer mirror)
2. Connect the blind spot monitoring (BSM) warning indicator light connector
(with blind spot monitoring system).
NOTE:
Lightly pull the blind spot monitoring (BSM) warning indicator light connector
and verify t ...
Multiplex Communication System
A controller area network (CAN) system has been adopted in which multiplex
communication is performed using a single communication path.
A high-speed controller area network (HS-CAN) has been adopted for the communication
between the following modules:
PCM
...
Air Bag Module And Pre Tensioner Seat Belt Disposal Procedures [Standard Deployment
Control System]
WARNING:
A live (undeployed) air bag module or pre-tensioner seat belt may accidentally
operate (deploy) when it is disposed of and cause serious injury. Always refer
to the “AIR BAG MODULE AND PRE-TENSIONER SEAT BELT DEPLOYMENT PROCEDURES” and
dispose of air bag modules and pre ...
