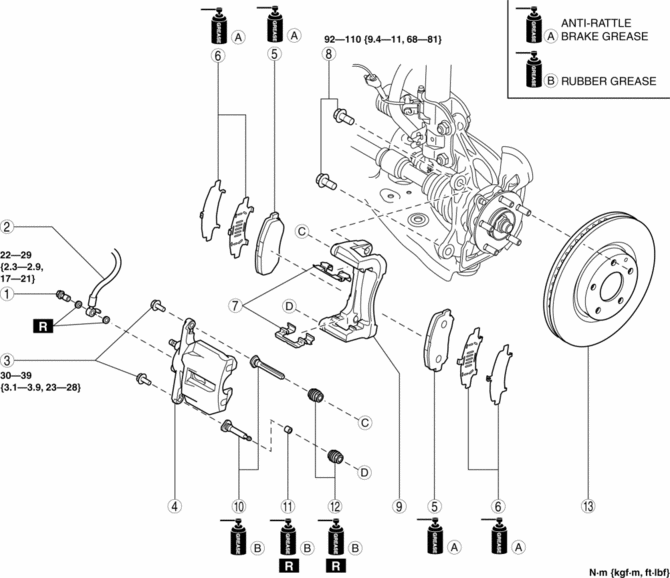
Mazda CX-5 Service & Repair Manual: Front Brake (Disc) Removal/Installation
1. Remove in the order indicated in the table.
2. Install in the reverse order of removal.
3. After installation, add brake fluid, bleed the air, and inspect for fluid leakage..
4. Depress the brake pedal a few times, rotate the wheel by hand, and verify that the brake does not drag.
|
1 |
Bolt |
|
2 |
Brake hose |
|
3 |
Bolt |
|
4 |
Caliper (See Disc Pad Installation Note.) |
|
5 |
Disc pad (See Disc Pad Installation Note.) |
|
6 |
Shim |
|
7 |
Guide plate |
|
8 |
Bolt |
|
9 |
Mounting support |
|
10 |
Slide pin |
|
11 |
Bushing |
|
12 |
Dust boot |
|
13 |
Disc plate |
Disc Pad Installation Note
1. Clean the exposed area of the piston.
2. Push the piston in using the commercially available disc brake expand tool.
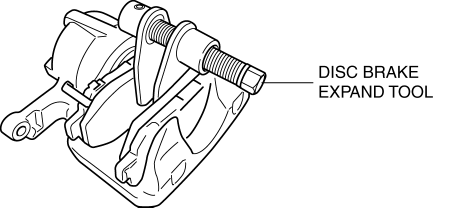
3. Install the disc pads to the mounting support.
 Front Brake (Disc) Inspection
Brake Judder Repair Hints
Description
1. Brake judder concern has the following 3 characteristics:
Steering wheel vibration
1. The steering wheel vibrates in the rotation direction. This characte ...
 Rear Brake (Disc)
Purpose/Function
Large diameter, solid-disc type front brakes with a 303 mm {11.9 in} diameter
and 10 mm {0.39 in} thickness have been adopted, improving braking force and
fade resistance ...
Other materials:
Fuel Tank Inspection
WARNING:
Fuel is very flammable liquid. If fuel spills or leaks from the pressurized
fuel system, it will cause serious injury or death and facility breakage. Fuel
can also irritate skin and eyes. To prevent this, always complete the “Fuel
Line Safety Procedure”, while referring ...
Key Cylinder Switch
Purpose
The switch turns on/off in conjunction with the front door key cylinder lock/unlock
and the rear body control module (RBCM) detects the key cylinder operation condition
by the change in the voltage.
Function
The key cylinder switch contact point changes in conjuncti ...
Door Ajar Warning Light
Purpose
The door-ajar warning light notifies the driver that any door or the liftgate
is open.
Function
When the instrument cluster receives any of the following signals sent from
the rear body control module (RBCM) via the CAN signal, the door-ajar warning
light illumin ...
