Mazda CX-5 Owners Manual: Front Seat
Seat Operation
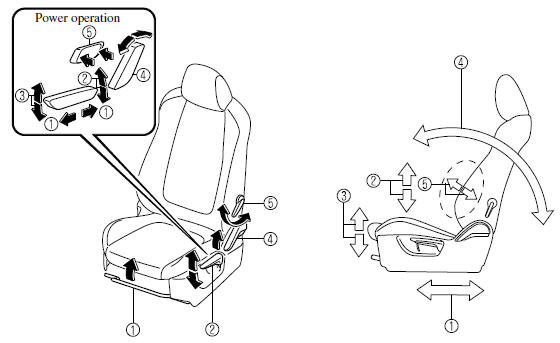
1 Seat Slide
(Manual Seat) To move a seat forward or backward, raise the lever and slide the seat to the desired position and release the lever.
Make sure the lever returns to its original position and the seat is locked in place by attempting to push it forward and backward.
(Power Seat) To slide the seat, move the slide lifter switch on the outside of the seat to the front or back and hold it. Release the switch at the desired position.
2 Height Adjustment (Driver's Seat)
(Manual Seat) To adjust the seat height, move the lever up or down.
(Power Seat) To adjust the seat height, move the switch up or down.
3 Front Height Adjustment of Seat Bottom (Driver's Seat)
(Power Seat) To adjust the front height of the seat bottom, raise or lower the front of the slide lifter switch.
4 Seat Recline
(Manual Seat) To change the seatback angle, lean forward slightly while raising the lever. Then lean back to the desired position and release the lever.
Make sure the lever returns to its original position and the seatback is locked in place by attempting to push it forward and backward.
(Power Seat) To change the seatback angle, press the front or rear side of the reclining switch. Release the switch at the desired position.
5 Lumbar Support Adjustment (Driver's Seat)
(Manual Operation) To increase the seat firmness, push the lever backward. Pull the lever forward to decrease firmness.
(Power Operation) To increase the seat firmness, press and hold the front part of the switch to the desired position, then release it.
Press the rear part of the switch to decrease firmness.
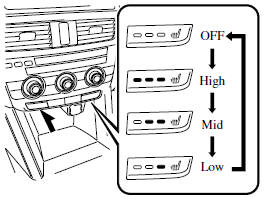
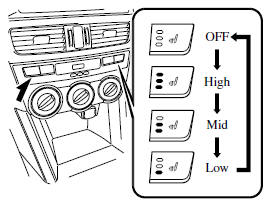
SeatWarmer
The front seats are electrically heated. The ignition must be switched ON.
Press the seat warmer switch to illuminate the indicator light while the ignition is switched ON. The mode changes as follow each time the seat warmer switch is pressed.
Fully Automatic Type Climate Control
Manual Type Climate Control
WARNING
Be careful when using the seat warmer: The heat from the seat warmer may be too hot for some people, as indicated below, and could cause a low-temperature burn.
● Infants, small babies, elderly people, and physically challenged people Ø People with delicate skin Ø People who are excessively fatigued Ø People who are intoxicated Ø People who have taken sleepinducing medicine such as sleeping pills or cold medicine Do not use the seat warmer with anything having high moistureretention ability such as a blanket or cushion on the seat: The seat may be heated excessively and cause a low-temperature burn.
Do not use the seat warmer even when taking a short nap in the vehicle: The seat may be heated excessively and cause a low-temperature burn.
Do not place heavy objects with sharp projections on the seat, or insert needles or pins into it: This could cause the seat to become excessively heated and result in injury from a minor burn.
CAUTION
Do not use organic solvents to clean the seat. It may damage the seat surface and the heater.
NOTE
• If the ignition is switched off while the seat warmer is operating (High, Mid or Low) and then switched ON again, the seat warmer will automatically operate at the temperature set before switching off the ignition.
• Use the seat warmer when the engine is running. Leaving the seat warmer on for long periods with the engine not running could cause the battery power to be depleted.
• The temperature of the seat warmer cannot be adjusted beyond High, Mid and Low because the seat warmer is controlled by a thermostat.
 Seat Precaution
WARNING
Make sure the adjustable components of a seat are locked in place:
Adjustable seats and seatbacks that are not securely locked are dangerous. In a
sudden stop or collision, the seat or sea ...
 Rear Seat
Split Folding
The seatbacks can be folded down to provide more space in the luggage compartment.
WARNING
Tightly secure cargo in the luggage compartment when it is transported
with the seatbacks ...
Other materials:
Cruise Control Switch Inspection
1. Disconnect the negative battery cable and wait for 1 min or more..
2. Remove the driver?side air bag module..
3. Disconnect the clock spring connector (part wiring harness-side).
4. Measure the resistance between clock spring terminals E and A (part wiring
harness-side) using a tester.
...
DSC HU/CM Inspection
1. Disconnect the DSC HU/CM connector..
2. Connect the negative battery cable..
3. Attach the tester lead to the DSC HU/CM wiring harness-side connector and
inspect voltage, continuity, or resistance according to the standard (reference)
on the table.
Standard (Reference)
...
Service Cautions
Injury/damage Prevention Precautions
Depending on the vehicle, the cooling fan may operate suddenly even when
the ignition is switched to off. Therefore, keep hands and tools away from the
cooling fan even if the cooling fan is not operating to prevent injury to personnel
or damage t ...
