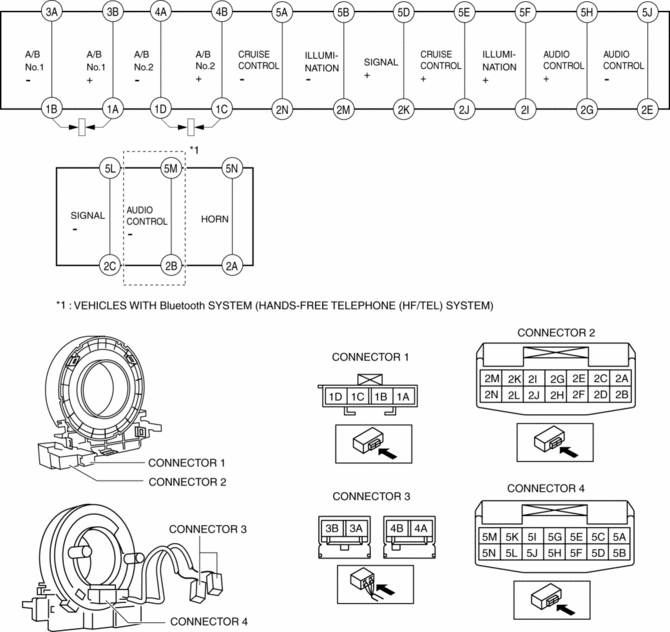
Mazda CX-5 Service & Repair Manual: Clock Spring Inspection [Two Step Deployment Control System]
1. Disconnect the negative battery cable and wait for 1 min or more
..
2. Remove the driver?side air bag module..
3. Remove the steering wheel..
4. Remove the column cover..
5. Remove the clock spring..
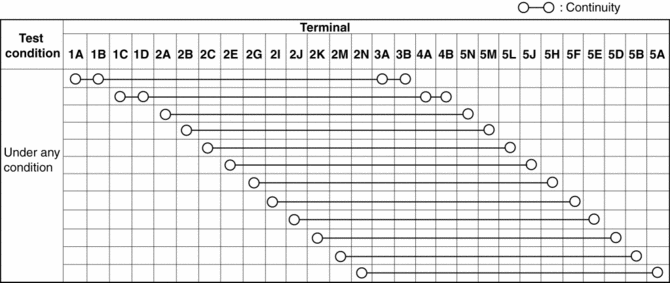
6. Verify that the continuity is as indicated in the table.
-
If not as indicated in the table, replace the clock spring.
NOTE:
-
When the vehicle-side connector for the clock spring is disconnected, terminals 1A, 1B, 1C and 1D are shorted to prevent unexpected operation (deployment) of the air bag module.
 Clock Spring Inspection [Standard Deployment Control System]
1. Disconnect the negative battery cable and wait for 1 min or more..
2. Remove the driver?side air bag module..
3. Remove the steering wheel..
4. Remove the column cover..
5. Remove the cloc ...
 Clock Spring Removal/Installation [Standard Deployment Control System]
CAUTION:
If the disc on the combination switch is deformed or has foreign material
adhering to it, performance of the steering angle sensor may be reduced, causing
abnormal operation. Wh ...
Other materials:
Driver Side Air Bag Module Removal/Installation [Standard Deployment Control
System]
WARNING:
Handling the air bag module improperly can accidentally deploy the air bag
module, which may seriously injure you. Read the air bag system service warnings
and cautions before handling the air bag module..
NOTE:
The driver-side air bag module is installed to the ...
Front Fender Junction Installation [Panel Replacement]
Symbol Mark
Installation Procedure
1. When installing new parts, measure and adjust the body as necessary to conform
with standard dimensions.
2. Drill holes for the plug welding before installing the new parts.
3. After temporarily installing new parts, make sure the related parts fit p ...
Bsm Indicator Light Flashes While Not Under Bsm Indicator Light Flashing Conditions
(No Combination Switch Operation (Turn Signal Switch)) [Blind Spot Monitoring (Bsm)]
Description
BSM indicator light flashes while not under BSM indicator light-flashing
conditions (no combination switch operation (turn signal switch)
The BSM indicator light flashes despite not satisfying the BSM indicator
light flashing ...
