Mazda CX-5 Service & Repair Manual: Windshield Wiper Arm And Blade Adjustment
1. Switch the ignition ON (engine off or on).
2. Operate the windshield wiper at low speed.
3. Verify that the windshield wiper operates at low speed and stop the windshield wiper.
4. Verify that the windshield wiper stops at the auto-stop position.
5. Remove the windshield wiper arm and blade..
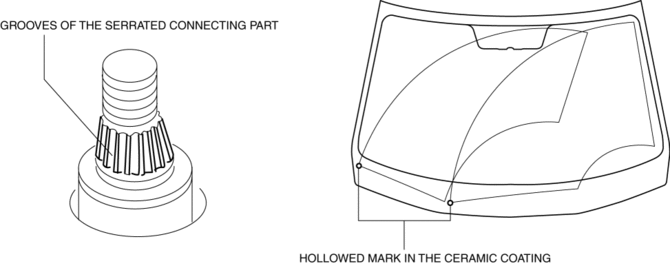
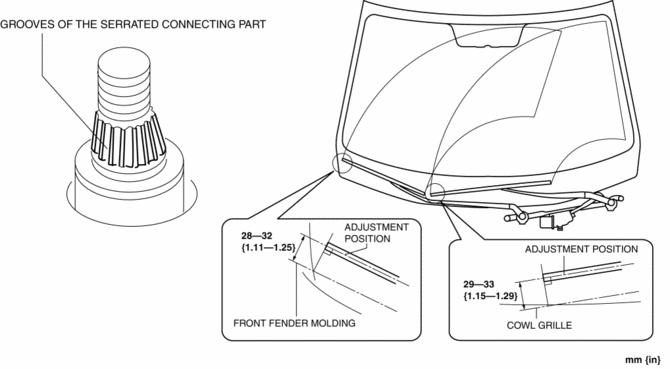
6. Install the windshield wiper arm to the serrated connecting part, adjust the windshield wiper blade so that its end is aligned with the hollowed mark in the ceramic coating while sliding the windshield wiper arm onto the grooves of the serrated connecting part one by one, and temporarily tighten the nut.

7. If the hollowed mark in the ceramic coating cannot be located, adjust the windshield wiper blade end to the area shown in the figure.
NOTE:
-
If the windshield wiper arm and blade is not installed to the position shown in the figure, repeat the adjustment procedure.

8. After adjusting the windshield wiper arm and blade, tighten the nut completely..
 Rear Wiper System
Outline
Equipped with continuous, auto-stop, intermittent wiper, and synchronized
washer and wiper operation.
The front body control module (FBCM) performs rear wiper and washer syst ...
 Windshield Wiper Arm And Blade Removal/Installation
Windshield Wiper Arm
1. Open the hood.
CAUTION:
If excessive force is applied when removing the cap, tabs could break. Carefully
remove the cap.
2. Insert a tape-wrapped precision ...
Other materials:
Parking Brake Lever Inspection
Stroke Inspection
1. Pump the brake pedal a few times.
2. Pull the parking brake lever two to three times.
3. Inspect the parking brake stroke by slowly pulling at point A 50 mm {2.0
in} from the end of the parking brake lever with a force of 98 N {10 kgf,
22 lbf} and counting the number of ...
Side Air Bag Sensor No. 1 Removal/Installation [Standard Deployment Control
System]
WARNING:
Handling the side air bag sensor improperly can accidentally operate (deploy)
the air bag module, which may seriously injure you. Read the air bag system
service warnings and cautions before handling the side air bag sensor..
1. Switch the ignition to off.
2. Disconnec ...
Manifold Absolute Pressure (Map) Sensor
Purpose/Function
Detects the intake air pressure introduced into the cylinder as basic information
for mainly determining the fuel injection amount.
Detects the intake air pressure introduced into the cylinder and inputs it
to the PCM as an intake air pressure signal.
Cons ...
