Mazda CX-5 Service & Repair Manual: Windshield Washer Nozzle Removal/Installation
1. Remove the following parts:
a. Windshield wiper arm and blade.
b. Cowl grille.
2. Disconnect the windshield washer hose from the windshield washer nozzle..
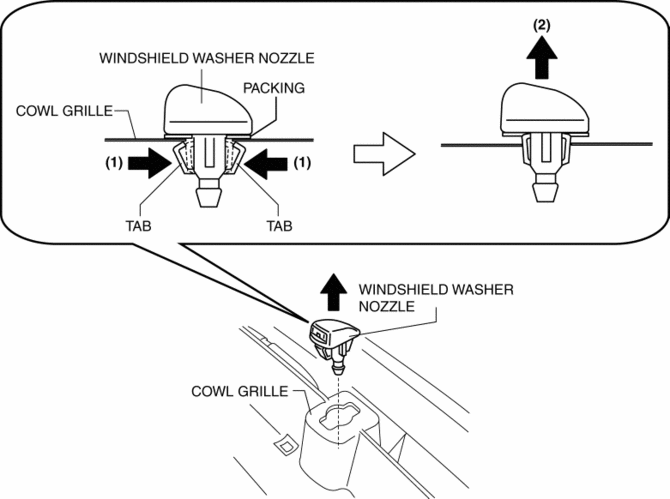
3. While pressing windshield washer nozzle tabs in the direction of the arrow (1) shown in the figure, pull the windshield washer nozzle in the direction of the arrow (2) to remove it from the cowl grille.
4. Install in the reverse order of removal.
5. Adjust the windshield washer nozzle..
 Windshield Washer Nozzle Adjustment
CAUTION:
If the nozzle is adjusted by inserting a stick-like object into the nozzle,
it could deform the injection nozzle and the washer fluid may not spray normally.
When adjusting the ...
 Washer Fluid Level Sensor
Purpose
The washer fluid-level sensor illuminates the low washer fluid level warning
light when the washer fluid level is lowered.
Function
The washer fluid-level sensor detects ...
Other materials:
Wheel Hub, Steering Knuckle Removal/Installation
CAUTION:
Performing the following procedures without first removing the ABS wheel-speed
sensor may possibly cause an open circuit in the wiring harness if it is pulled
by mistake. Before performing the following procedures, disconnect the ABS wheel-speed
sensor connector (axle sid ...
Before Service Precaution
WARNING:
Fuel vapor is hazardous. It can very easily ignite, causing serious injury
and damage. Always keep sparks and flames away from fuel.
Fuel line spills and leakage from the pressurized fuel system are dangerous.
Fuel can ignite and cause serious injury or death and damag ...
Fuel Injector
Purpose, Function
Promotes atomization of fuel by injecting it from the multiple holes.
Injects fuel according to the control signal from the PCM.
Construction
The fuel injector is installed to the cylinder head.
The fuel injector has multiple injection hole ...
