Mazda CX-5 Service & Repair Manual: Windshield Washer Hose Removal/Installation
1. Disconnect the negative battery cable..
2. Remove the front over fender..
3. Remove the mudguard (RH)..
4. Remove the windshield wiper arm and blade..
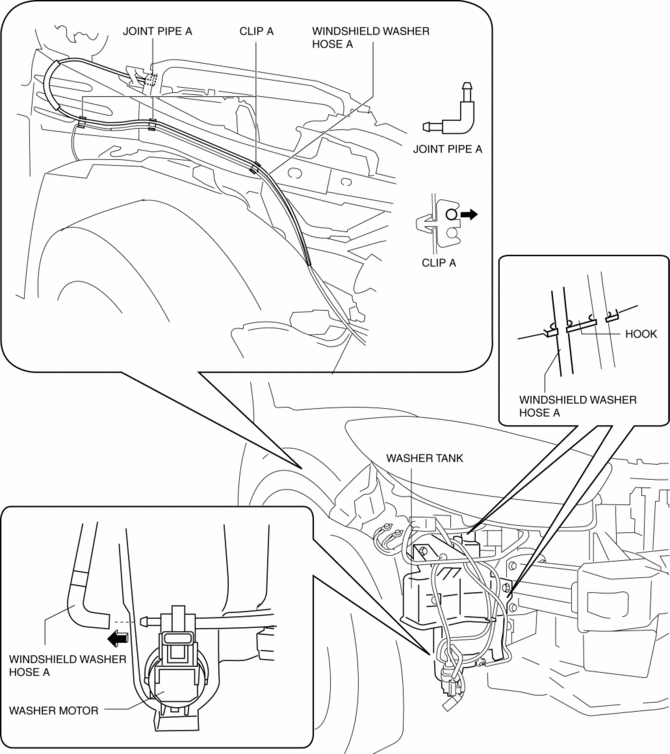
5. Disconnect the windshield washer hose A from the washer motor.
6. Remove the windshield washer hose A from the washer tank hook.
7. Remove the windshield washer hose A from clips A.
8. Disconnect the windshield washer hose A from the joint pipe A and remove it.
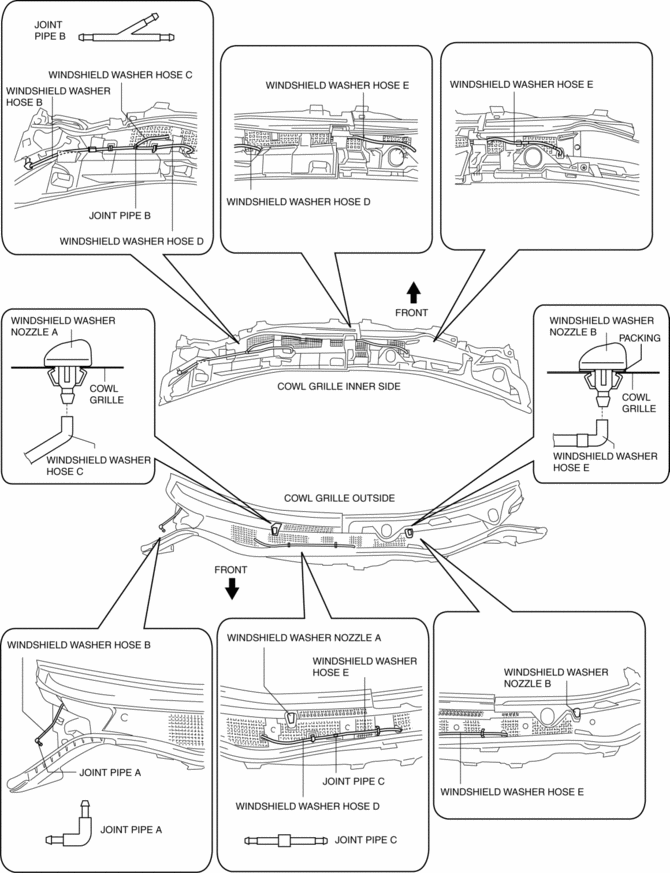
9. Remove the cowl grille..
10. Disconnect the windshield washer hose B from the joint pipe A.
11. Disconnect the windshield washer hose B from the joint pipe B and remove it.
12. Disconnect the windshield washer hose C from the windshield washer nozzle A.
13. Disconnect the windshield washer hose C from the joint pipe B and remove it.
14. Disconnect the windshield washer hose D from the joint pipe B.
15. Disconnect the windshield washer hose D from the joint pipe C and remove it.
16. Disconnect the windshield washer hose E from the windshield washer nozzle B.
17. Disconnect the windshield washer hose E from the joint pipe C and remove it.
18. Install in the reverse order of removal.
 Washer Tank Removal/Installation
With Washer Fluid-level Sensor
1. Disconnect the negative battery cable..
2. Set the front over fender aside..
3. Set the mudguard (RH) aside..
4. Remove the front bumper..
5. Remove the brac ...
 Windshield Washer Nozzle Adjustment
CAUTION:
If the nozzle is adjusted by inserting a stick-like object into the nozzle,
it could deform the injection nozzle and the washer fluid may not spray normally.
When adjusting the ...
Other materials:
Passenger Compartment Temperature Sensor Inspection [Full Auto Air Conditioner]
1. Measure the temperature around the passenger compartment temperature sensor
and measure the resistance between passenger compartment temperature sensor terminals
A and B.
If the characteristics of the passenger compartment temperature sensor are
not as shown in the graph, replace t ...
Start Stop Unit
Purpose
Performs control of several systems based on input/output signals from switches.
Function
The start stop unit controls systems based on the input/output signals.
The functions which are controlled are as follows:
Control Table
Control ...
Clock Spring Inspection [Two Step Deployment Control System]
1. Disconnect the negative battery cable and wait for 1 min or more..
2. Remove the driver?side air bag module..
3. Remove the steering wheel..
4. Remove the column cover..
5. Remove the clock spring..
6. Verify that the continuity is as indicated in the table.
If not as indicated ...
