Mazda CX-5 Service & Repair Manual: Washer Motor Removal/Installation
1. Disconnect the negative battery cable..
2. Set the front over fender aside..
3. Set the mudguard (RH) aside..
4. Remove the front bumper..
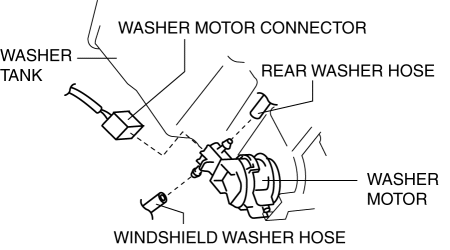
5. Disconnect the washer motor connector from the washer motor.
6. Disconnect the windshield washer hose from the washer motor.
7. Disconnect the rear washer hose from the washer motor.
NOTE:
-
If the washer motor is removed with washer fluid in the washer tank, the washer fluid may leak out. When removing the washer motor from the washer tank, place a container under the washer tank to collect washer fluid, and perform the procedure.
8. Rotate the washer motor counterclockwise/clockwise rotation repeatedly in the direction of the arrows (1) and (2) shown in the figure, and then remove it in the direction of the arrow (3).
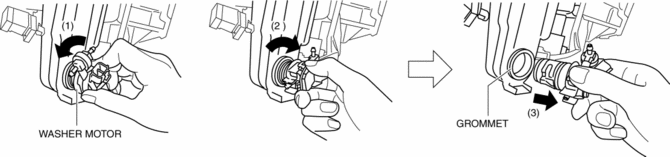
9. Remove the grommet.
10. Install in the reverse order of removal.
 Washer Motor Inspection
1. Disconnect the negative battery cable..
2. Set the front over fender aside..
3. Set the mudguard (RH) aside..
4. Remove the front bumper..
5. Disconnect the washer motor connector from the ...
 Washer Nozzle
Purpose
The washer nozzle sprays the washer fluid sent from the washer motor to the
optimum positions on the windshield.
Construction
A ball-shaped spray orifice is set inside t ...
Other materials:
Sae Standards
In accordance with new regulations, SAE (Society of Automotive Engineers)
standard names and abbreviations are now used in this manual. The table below
lists the names and abbreviations that have been used in Mazda manuals up to
now and their SAE equivalents.
...
Moonroof
The moonroof can be opened or closed electrically only when the ignition is switched
ON.
WARNING
Do not let passengers stand up or extend part of the body through the open moonroof
while the vehicle is moving:
Extending the head, arms, or other parts of the body through the moonroof is
da ...
Returnless Fuel System
Purpose, Outline
Fuel evaporation in the fuel tank is reduced by adjusting the fuel amount
(fuel pressure) ejected from the fuel pump and preventing fuel warmed in the
engine compartment from returning.
System Diagram
2WD
AWD
Structure
The returnless fuel system ...
