Mazda CX-5 Service & Repair Manual: Front Lower Arm Inspection
1. Remove the front lower arm..
2. Inspect the front lower arm for bending or damage, and the front lower arm ball joint for excessive looseness.
-
If there is any malfunction, replace the front lower arm.
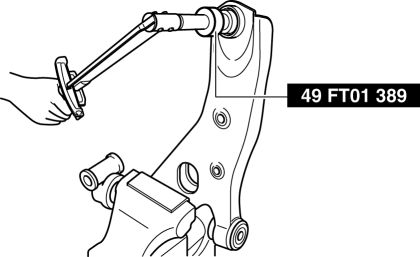
3. Rotate the front lower arm ball joint stud 5 times
. Install the SST
to the front lower arm ball joint stud, measure the rotational torque using a torque wrench.

-
If not within the specification, replace the front lower arm.
-
Front lower arm ball joint stud starting torque
-
18 N·m {1.8 kgf·m,13 ft·lbf} max.
-
Front lower arm ball joint stud rotational torque
-
3.2 N·m {33 kgf·cm,28 in·lbf} max.
 Front Axle
Purpose, Function
An angular ball bearing, with a low rotational resistance, has been adopted,
improving driveability.
A unit bearing that does not require pre-load setting has bee ...
 Front Lower Arm Removal/Installation
1. Remove the front under cover No.2..
2. Remove in the order indicated in the table.
3. Install in the reverse order of removal.
4. Inspect the wheel alignment and adjust it if necessary..
...
Other materials:
Auto Light Off System
Purpose
The auto light-Off system turns off the TNS or headlights automatically.
The front body control module (FBCM) performs auto light-Off system fail-safe..
Function
The auto light-Off system controls the front body control module (FBCM).
The front body contro ...
Shift Pressure Control (Learning Control) [Fw6 A EL, Fw6 Ax EL]
Outline
The TCM optimizes the hydraulic pressure for clutch engagement and disengagement
through learning correction of the clutch engagement pressure.
NOTE:
The clutch engagement pressure learning value stored in the TCM is not cleared
even if the negative battery termina ...
Turning the Engine Off
WARNING
Do not stop the engine while the vehicle is moving:
Stopping the engine while the vehicle is moving for any reason other than in
an emergency is dangerous.
Stopping the engine while the vehicle is moving will result in reduced braking
ability due to the loss of power braking, which co ...
