Mazda CX-5 Service & Repair Manual: Washer Motor Inspection
1. Disconnect the negative battery cable..
2. Set the front over fender aside..
3. Set the mudguard (RH) aside..
4. Remove the front bumper..
5. Disconnect the washer motor connector from the washer motor.
6. Disconnect the windshield washer hose from the washer motor.
7. Disconnect the rear washer hose from the washer motor.
WARNING:
-
Water sprayed on the battery and ground could cause electrocution. When performing the washer motor inspection, prepare a container to collect washer fluid and be careful not to spray washer fluid.
8. After connecting washer motor terminal A to the positive battery terminal, and terminal B to ground, verify that washer fluid sprays from the front side of the washer motor.
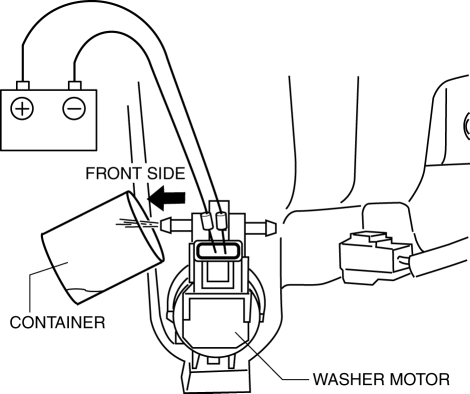
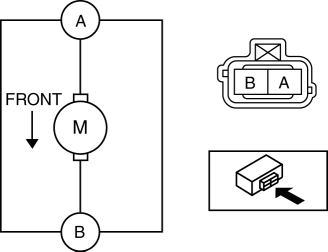
-
If there is any malfunction, replace the washer motor..
9. After connecting washer motor terminal B to the positive battery terminal, and washer motor terminal A to ground, verify that washer fluid sprays from the rear side of the washer motor.
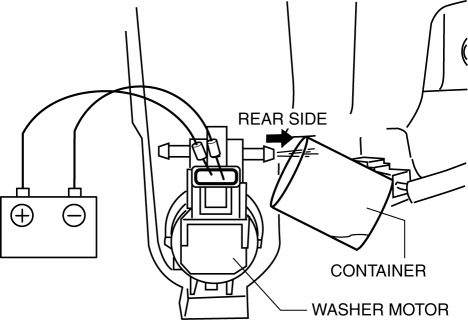
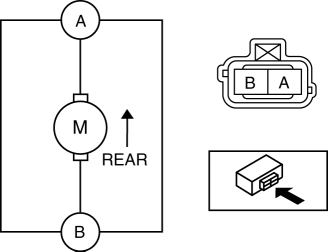
-
If there is any malfunction, replace the washer motor..
 Rear Washer Nozzle Removal/Installation
1. Disconnect the negative battery cable..
2. Remove the liftgate upper trim..
3. Remove the rear spoiler..
4. Disconnect the rear washer hose from the rear washer nozzle..
5. While pressing t ...
 Washer Motor Removal/Installation
1. Disconnect the negative battery cable..
2. Set the front over fender aside..
3. Set the mudguard (RH) aside..
4. Remove the front bumper..
5. Disconnect the washer motor connector from the ...
Other materials:
Oil Control Valve (OCV)
Purpose, Function
The OCV switches the oil passage to the hydraulic variable valve timing actuator
to control the opening/closing period of the exhaust valve.
Construction
The OCV is installed to the exhaust camshaft cap (No.1).
The OCV consists of a spool valve wh ...
Wiper/Washer System Personalization
A customize function has been adopted which switches the auto wiper system
between operable/inoperable.
Using Mazda Modular Diagnostic System (M-MDS)
The auto wiper function can be enabled or disabled using the Mazda Modular
Diagnostic System (M-MDS). Refer to the Workshop M ...
Electric Variable Valve Timing Actuator, Hydraulic Variable Valve Timing Actuator
Removal/Installation
WARNING:
A hot engine can cause severe burns. Turn off the engine and wait until it
is cool before servicing.
CAUTION:
Do not disassemble the electric variable valve timing actuator and hydraulic
variable valve timing actuator because they are precision units.
If ...
