Mazda CX-5 Service & Repair Manual: Headliner Removal/Installation
1. Disconnect the negative battery cable..
2. Remove the following parts:
a. Sunroof seaming welt (with sunroof system).
b. A-pillar trim.
c. Front map light.
d. Sunvisor.
e. Front scuff plate.
f. Rear scuff plate.
g. B-pillar lower trim.
h. Adjust anchor cover.
i. Upper anchor installation bolt on the seat belt.
j. B-pillar upper trim.
k. Assist handle.
l. Trunk board.
m. Trunk end trim.
n. Trunk side trim.
o. D-pillar trim.
p. C-pillar trim.
3. Disconnect the roof wiring harness connector and remove the roof wiring harness connector clip from the body.
4. Disconnect the rear washer hose C. (with rear washer system).
5. Temporarily install the seaming welt shown in the figure to the headliner.
CAUTION:
-
If fasteners are removed without temporarily installing the seaming welt, the headliner may fall off and the part may be damaged. Before removing fasteners, temporarily install the seaming welt to prevent the headliner from falling off.
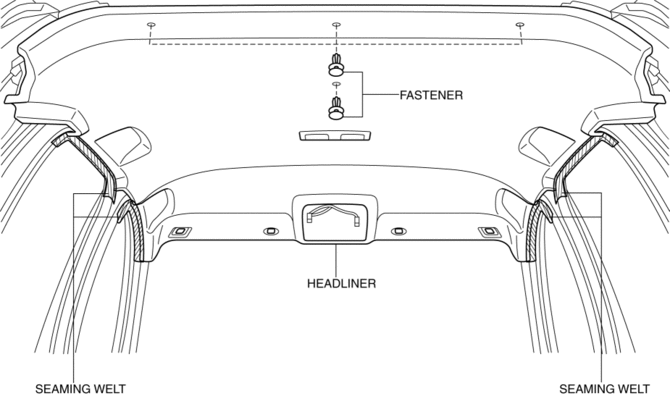
6. Remove fasteners.
7. Partially peel back the seaming welt. Take the headliner out from the opened liftgate.
8. Install in the reverse order of removal.
 Headliner
Purpose/Function
The headliner is equipped with a shock absorbing pad for driver's head protection
during a collision.
Construction
The front and rear side of the headliner ...
 Roof Molding Installation
1. Install the roof molding to the front T-studs.
2. Hook the roof molding to clips and attach the roof molding while pressing
it in the direction of the arrow shown in the figure.
3. Instal ...
Other materials:
Front Door Key Cylinder Removal/Installation
1. Disconnect the negative battery cable..
2. Remove the service hole cover.
3. Detach the screw from the front door key cylinder.
NOTE:
The screw cannot be removed because the front outer handle bracket has a
stopper which prevents the screw from falling.
4. While pre ...
Parking in an Emergency
Parking in an Emergency
The hazard warning lights should always be used when you stop on or near a roadway
in an emergency.
The hazard warning lights warn other drivers that your vehicle is a traffic hazard
and that they must take extreme caution when near it.
Depress the hazard warning fla ...
Piston, Piston Ring, Piston Pin
Purpose, Function
Piston
The piston in the cylinder of the cylinder block moves reciprocally by the
pressure received when the air-fuel mixture combusts.
Piston ring
The piston ring consists of the compression ring (top ring, second ring)
and the oil ring, and has the foll ...
