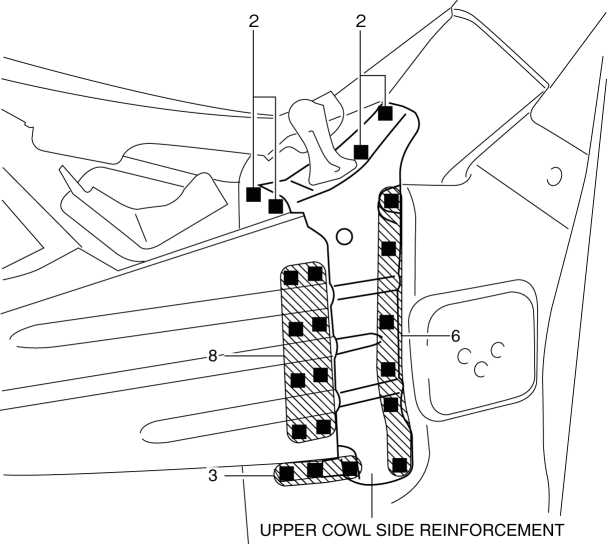
Mazda CX-5 Service & Repair Manual: Upper Cowl Side Reinforcement Installation [Panel Replacement]
Symbol Mark

Installation Procedure
1. When installing new parts, measure and adjust the body as necessary to conform with standard dimensions.
2. Drill holes for the plug welding before installing the new parts.
3. After temporarily installing new parts, make sure the related parts fit properly.
4. Plug weld the 21 locations shown in the figure, then install the upper cowl side reinforcement.
 Underbody Dimensions [Dimensions]
NOTE:
The following figure is a bottom view.
Point symbol
Designation
Hole diameter or bolt or nut size mm {in}
A
...
 Upper Cowl Side Reinforcement Removal [Panel Replacement]
Symbol Mark
Removal Procedure
1. Drill the 13 locations indicated by (A) shown in the figure.
2. Drill the 8 locations indicated by (B) shown in the figure.
NOTE:
When a drill the 8 ...
Other materials:
Propeller Shaft Inspection
1. Measure the propeller shaft center runout using the dial gauge.
If it exceeds the maximum specification, replace the propeller shaft as a
single component.
Propeller shaft maximum runout
0.8 mm {0.031 in}
2. Inspect the play and rotation of the joint by turning ...
Neutral Switch Removal/Installation [C66 M R]
1. Disconnect the negative battery cable..
2. Remove the air cleaner component. (ex: air cleaner, air hose).
3. Remove in the order indicated in the table.
4. Install in the reverse order of removal.
1
Neutral switch connector
2
Neutral ...
Magnetic Clutch Disassembly/Assembly [Full Auto Air Conditioner]
1. Disassemble in the order indicated in the table.
1
Bolt
(See Bolt Removal/Installation Note.)
2
Pressure plate
3
Shim
(See Shim Installation Note.)
4
Snap ring
(See Snap Ring ...
