Mazda CX-5 Service & Repair Manual: Power Window Motor Removal/Installation
Front Power Window Motor
1. Fully lower the front door glass.
2. Disconnect the negative battery cable..
3. Remove the inner garnish..
4. Remove the front door trim..
5. Disconnect the front power window motor connector.
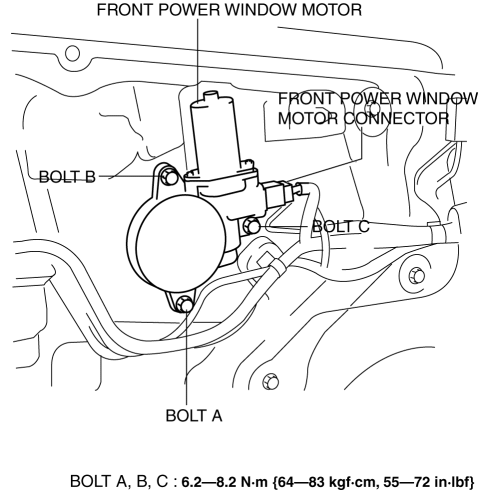
6. Remove bolt A.
7. Remove bolt B.
8. Remove bolt C.
9. Remove the front power window motor.
10. Install in the reverse order of removal.
NOTE:
-
When installing the power window motor to the power window regulator drum, the drum housing tab may come off the door unit. If this happens, remove the door speaker, insert your hand in the speaker installation hole, connect the drum housing tabs, and while supporting the drum housing, install the power window motor to the drum.
Rear Power Window Motor
1. Fully lower the rear door glass.
2. Disconnect the negative battery cable..
3. Remove the rear door trim..
4. Disconnect the rear power window motor connector.
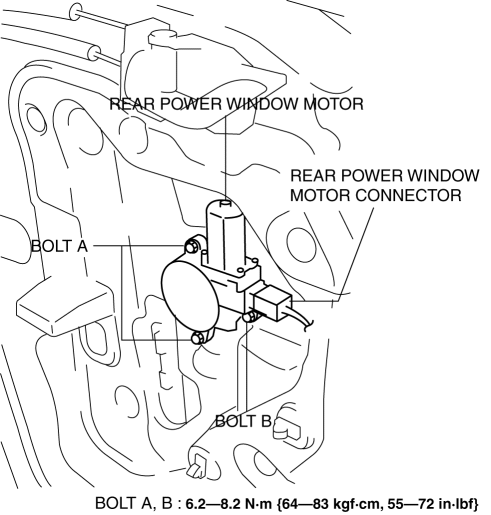
5. Remove bolts A.
6. Remove bolt B.
7. Remove the rear power window motor.
8. Install in the reverse order of removal.
NOTE:
-
When installing the power window motor to the power window regulator drum, the drum housing tab may come off the door unit. If this happens, remove the door speaker, insert your hand in the speaker installation hole, connect the drum housing tabs, and while supporting the drum housing, install the power window motor to the drum.
 Power Window Motor Inspection
Front driver side
1. Disconnect the negative battery cable..
2. Remove the inner garnish..
3. Remove the front door trim..
4. Disconnect the power window motor connector.
5. Apply battery pos ...
 Power Window Regulator
Purpose
The power window regulator moves the carrier plate up and down to open/close
the door glass using the rotation force transmitted from the power window motor.
Function
Th ...
Other materials:
Fuel Pressure Sensor Inspection
Voltage Inspection
NOTE:
The fuel pressure sensor cannot be removed as a single unit. When replacing
the fuel pressure sensor, replace it together with the fuel distributor as a
single unit.
1. Connect the M-MDS to the DLC?2.
2. Switch the ignition ON (engine off or on).
3. ...
Automatic Transaxle Fluid (ATF) Replacement [Fw6 A EL, Fw6 Ax EL]
WARNING:
Do not perform the servicing while the ATF is hot. Otherwise, it could cause
severe burns or serious injury.
1. Remove the front under cover No.2..
2. Remove the dipstick securing bolt.
3. Remove the dipstick.
4. Remove the drain plug and washer, and drain the ATF ...
Front Fog Lights Indicator Light
Purpose
Notifies the user that the front fog lights are illuminated.
Function
Illuminates when the front fog light illumination conditions are met.
Construction
Displayed in the instrument cluster.
Operation
1. With the light switch in the TNS, HEAD, or ...
