Mazda CX-5 Service & Repair Manual: Underbody Dimensions [Dimensions]
NOTE:
-
The following figure is a bottom view.
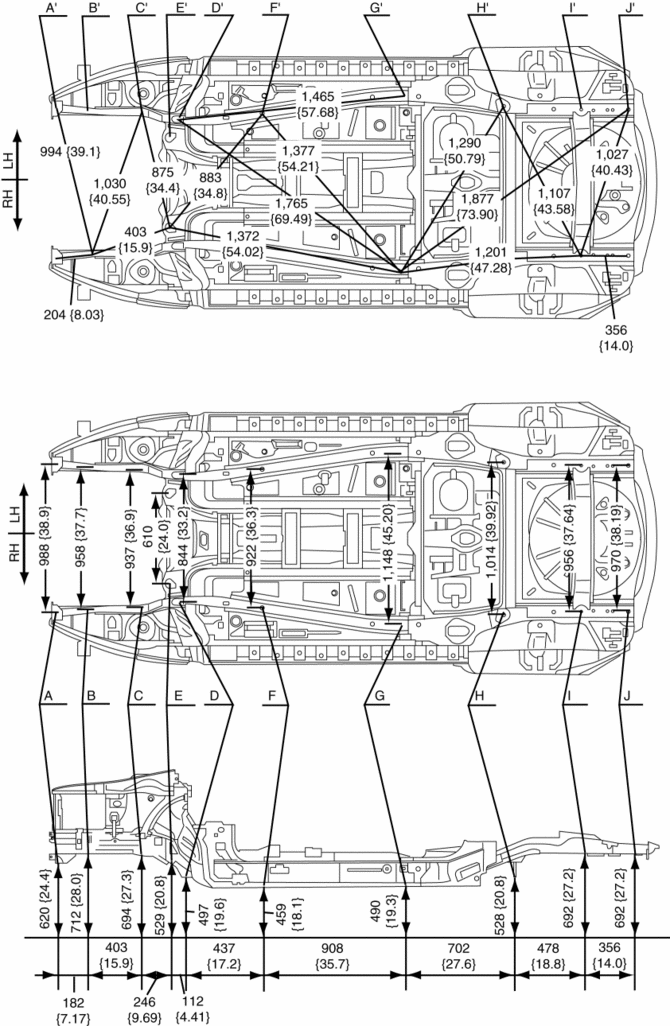
|
Point symbol |
Designation |
Hole diameter or bolt or nut size mm {in} |
|
A |
Front crossmember installation hole |
?24 {0.94} |
|
B |
Front side frame datum hole |
?16 {0.63} |
|
C |
Front crossmember installation hole |
?22.5 {0.886} |
|
D |
Front crossmember installation hole |
?19 {0.75} |
|
E |
Front crossmember installation hole |
?22 {0.87} |
|
F |
Front B frame datum hole |
?16 {0.63} |
|
G |
Front B frame datum hole |
?25 {0.98} |
|
H |
Rear crossmember mounting bolt |
M12 |
|
I |
Rear side frame datum hole |
?10 {0.39} |
|
J |
Rear side frame datum hole |
?30 {1.2} |
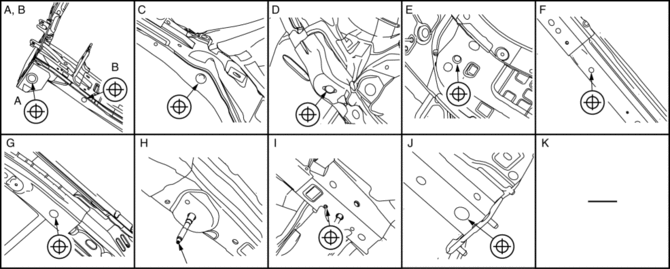
 Splash Shield Removal/Installation
Front
Front splash shield No.1
1. Set the mudguard aside..
2. Remove fasteners A.
3. Remove the front splash shield No.1.
4. Install in the reverse order of removal.
Front splash shield ...
 Upper Cowl Side Reinforcement Installation [Panel Replacement]
Symbol Mark
Installation Procedure
1. When installing new parts, measure and adjust the body as necessary to conform
with standard dimensions.
2. Drill holes for the plug welding before inst ...
Other materials:
Construction Standard Values [Construction Standard Values]
Front view
No.
Measurement part
Standard values (mm {in})
Maximum values (mm {in})
Minimum values (mm {in})
Side by difference (mm {in})
A
1
5.0
{0.20}
7.0
{ ...
Selector Lever Inspection
1. Switch the ignition ON (engine off or on).
2. Perform the following procedures to inspect the selector lever.
If there is any malfunction, adjust the selector cable..
a. Verify that the selector lever can be operated as shown in the figure.
b. Verify that the selector lever ...
PID/Data Monitor Inspection [Front Body Control Module (Fbcm)]
1. Connect the M-MDS to the DLC-2.
2. After the vehicle is identified, select the following items from the initialization
screen of the M-MDS.
a. Select “DataLogger”.
b. Select “Modules”.
c. Select “F_BCM”.
3. Select the applicable PID from the PID table.
4. Verify the PID ...
