Mazda CX-5 Owners Manual: Troubleshooting
Bluetooth® does not operate under the following conditions. Check whether the following conditions apply to your Bluetooth® device:
• The device is not being operated correctly.
• The device is not connected to the Bluetooth® unit equipped on the vehicle.
• The device's battery is weak.
• A device which interferes with radio wave reception has been placed in the vehicle.
• The ignition switch has been turned off.
If none of the above conditions apply, refer to the following to see if any of the problem symptoms correspond to your device.
If the problem cannot be resolved, consult an Authorized Mazda Dealer or Mazda Bluetooth® Hands-Free Customer Service.
Mazda Bluetooth® Hands-Free Customer Service
If you have any problems with Bluetooth®, contact with our toll-free customer service center.
• U.S.A.
Phone:800-430-0153 (Toll-free) Web: www.MazdaUSA.com/bluetooth •Canada Phone:800-430-0153 (Toll-free) Web: www.mazdahandsfree.ca • Mexico Center of Attention to Client (CAC) Phone:01-800-01-MAZDA (Toll-free) Web: www.MazdaUSA.com/bluetooth
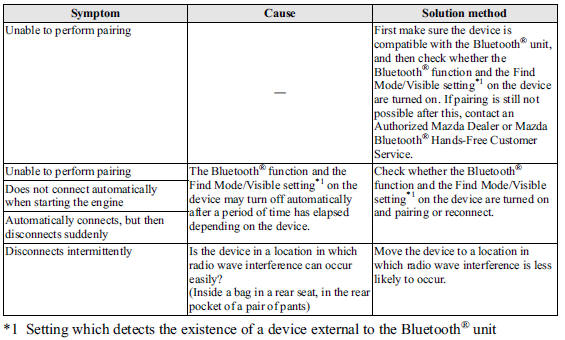
Device pairing, connection problems
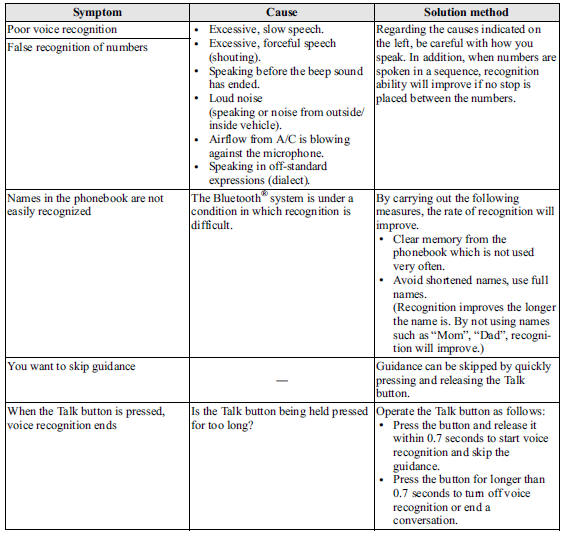
Voice recognition related problems
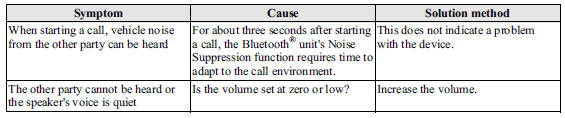
Regarding problems with calls
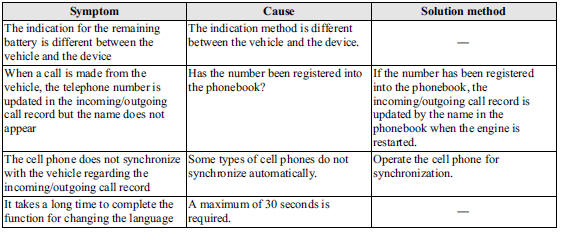
Other problems
 Bluetooth® Audio
Applicable Bluetooth® specification Ver. 2.0 or higher
Response profile
• A2DP (Advanced Audio Distribution Profile)
Ver. 1.0/1.2
• AVRCP (Audio/Video Remote Control Profile)
Ver. 1.0/1.3/ ...

Other materials:
Engine Coolant
Inspecting Coolant Level
WARNING
Do not use a match or live flame in the engine compartment. DO NOT ADD COOLANT
WHEN THE ENGINE IS HOT:
A hot engine is dangerous. If the engine has been running, parts of the engine
compartment can become very hot. You could be burned.
Carefully inspect the e ...
Rear Buckle Removal/Installation
1. Switch the ignition to off.
2. Disconnect the negative battery cable and wait for 1 min or more..
3. Press the release switch, then disconnect the rear center seat belt and rear
buckle.
4. Fold down the rear seat back.
5. Remove the trunk board..
6. Remove the bolt.
7. Remo ...
Clutch Disc Inspection [C66 M R]
Operation Inspection
1. Inspect the lining surface for discoloration and grease adhesion.
2. Inspect the torsion spring for weakness and the rivets for looseness.
3. Using a vernier caliper, measure the depth between the lining surface and
the rivet head.
Minimum clutch disc thicknes ...
