Mazda CX-5 Service & Repair Manual: Side Turn Light Inspection
1. Disconnect the negative battery cable..
2. Remove the following parts:
a. Outer mirror glass.
b. Upper outer mirror garnish.
c. Side turn light.
3. Apply battery voltage to side turn light terminal A, and connect terminal B to ground.
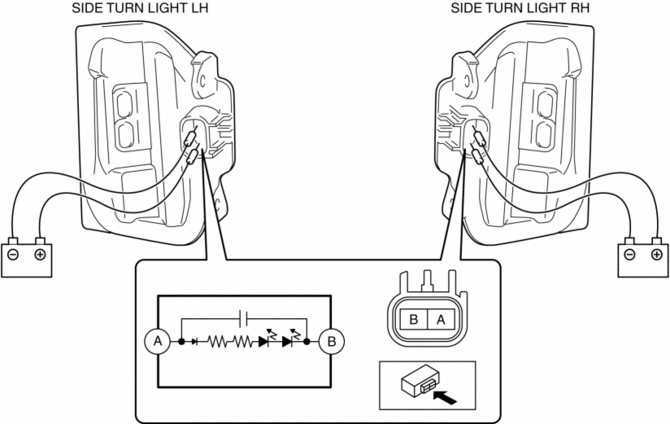
4. Verify that the LED illuminates.
-
If the LED illuminates, go to the next step.
-
If the LED does not illuminate, replace the side turn light.
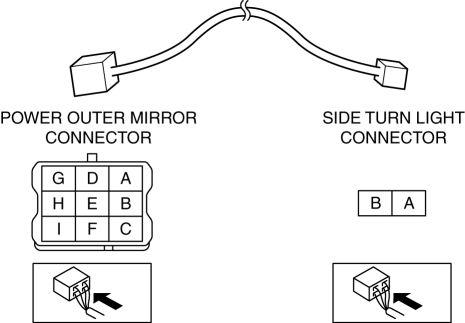
5. Remove the following parts:
a. Inner garnish.
b. Front door trim.
c. Power outer mirror connector.
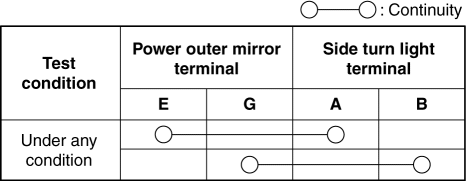
6. Verify that the continuity between the side turn light terminals from the power outer mirror is as indicated in the table.
-
If not as indicated in the table, replace the power outer mirror.
 Side Turn Light
Purpose
The side turn lights are used to signal vehicles/people at the side of the
vehicle that the vehicle is going to make a right or left turn.
Function
The side turn lights ...
 Side Turn Light Removal/Installation
1. Disconnect the negative battery cable..
2. Remove the following parts:
a. Outer mirror glass.
b. Upper outer mirror garnish.
3. Remove the screws.
4. Disconnect the connector.
5. Re ...
Other materials:
Curtain Air Bag Module [Standard Deployment Control System]
Purpose
When a curtain air bag module receives an impact from a lateral collision,
the operation (deployment) of the air bag mediates the impact to the head of
the driver and front passenger.
Function
When a curtain air bag module receives an impact from a lateral collision ...
Rocking the Vehicle
WARNING
Do not spin the wheels at more than 56 km/h (35 mph), and do not allow anyone
to stand behind a wheel when pushing the vehicle: When the vehicle is stuck, spinning
the wheels at high speed is dangerous. The spinning tire could overheat and explode.
This could cause serious injuries.
...
Liftgate Upper Trim Removal/Installation
1. Take the shaded area shown in the figure, detach tab A while pulling the liftgate
upper trim in the direction of the arrow (1) shown in the figure, then detach clips
B, clip C and pin D while pulling in the direction of the arrow (2).
2. Take the shaded area shown in the figure, detach ...
