Mazda CX-5 Service & Repair Manual: Shroud Side Member Installation [Panel Replacement]
Symbol Mark

Installation Procedure
1. When installing new parts, measure and adjust the body as necessary to conform with standard dimensions.
2. Drill holes for the plug welding before installing the new parts.
3. After temporarily installing new parts, make sure the related parts fit properly.
4. Plug weld the 8 locations indicated by (A) and 2 locations indicated by (B) shown in the figure.
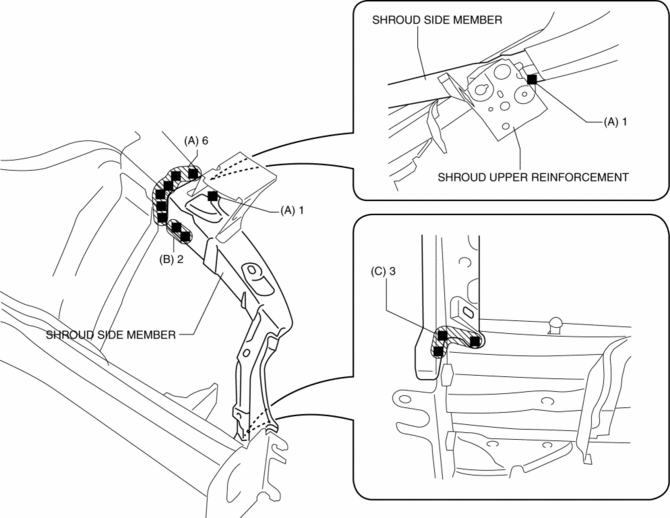
5. Plug weld the 3 locations indicated by (C) shown in the figure, then install the shroud side member.
 Shroud Panel Removal/Installation
CAUTION:
Since the servicing is performed with the hood open, secure the hood using
a piece of wood to prevent it from falling.
1. Disconnect the negative battery cable..
2. Remove ...
 Shroud Side Member Removal [Panel Replacement]
Symbol Mark
Removal Procedure
1. Drill the 3 locations indicated by (A) shown in the figure.
2. Drill the 8 locations indicated by (B) and 2 locations indicated by (C) shown
in the figure.
...
Other materials:
Engine Oil Replacement
WARNING:
Hot engines and engine oil can cause severe burns. Turn off the engine and
wait until it and the engine oil have cooled.
A vehicle that is lifted but not securely supported on safety stands is dangerous.
It can slip or fall, causing death or serious injury. Never work ...
Cargo Compartment Light
Purpose
The cargo compartment light illuminates the cargo room interior when the
liftgate is opened.
Function
When the liftgate is opened, illuminates by the cargo room light switch turning
on.
Construction
The cargo room light is installed to the trunk side tr ...
Fuel Gauge Sender Unit Removal/Installation [Awd]
WARNING:
Always keep sparks and flames away from fuel when servicing the fuel system.
Fuel can be easily ignited which could cause serious injury or death, and damage
to equipment.
Fuel line spills and leakage from the pressurized fuel system are dangerous.
Fuel can ignite a ...
