Mazda CX-5 Owners Manual: Service Publications
Service
Publications
Factory-authorized Mazda service publications are available for owners who wish to do some of their own maintenance and repair.
When requesting any of our publications through an Authorized Mazda Dealer, refer to the chart below.
If they do not have what you need in stock, they can order it for you.
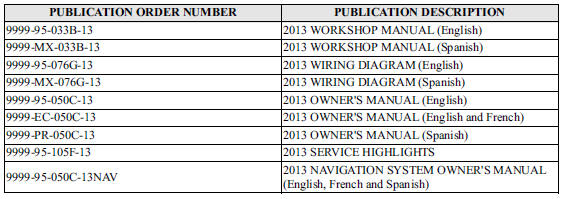
WORKSHOP MANUAL:
Covers recommended maintenance and repair procedures of the drive train, body and chassis.
WIRING DIAGRAM:
Provides electrical schematics as well as component location for the entire electrical system.
OWNER'S MANUAL:
This booklet contains information regarding the proper care and operation of your vehicle.
This is not a technician's manual.
SERVICE HIGHLIGHTS:
Provides description and operation of the many systems of your Mazda.
NAVIGATION SYSTEM OWNER'S MANUAL:
This booklet contains information regarding the proper operation and use of the navigation system. This is not a technician's manual.
 Declaration of Conformity
Declaration of Conformity
Keyless Entry System/Immobilizer System
Blind Spot Monitoring (BSM) System
Radiation Hazard
This BSM (blind spot monitoring) device emits intentional electromagnetic ra ...
 Specifications
Technical information about your Mazda. ...
Other materials:
Rear Door Hinge Removal/Installation
1. Disconnect the negative battery cable..
2. Remove the following parts:
a. Rear door.
b. Front scuff plate.
c. Rear scuff plate.
d. B-pillar lower trim.
3. Remove in the order shown in the figure.
1
Bolt
2
Nut
3 ...
Heated Oxygen Sensor (HO2 S) Heater Control
Outline
Based on the control of the HO2S heater, a stabilized oxygen concentration
is detected even at low exhaust temperatures, and feedback control of fuel injection
even at cold engine start is made possible for improved cold temperature exhaust
emission performance.
Both ...
Steering Wheel And Column Inspection
Play inspection
1. With the wheels in the straight-ahead position, start the engine.
2. Turn the steering wheel to the left and right gently, then verify that the
steering wheel play is within the specification.
Steering wheel play
0—30 mm {0—1.1 in}
Looseness, Exces ...
