Mazda CX-5 Service & Repair Manual: Sas Control Module Removal/Installation [Standard Deployment Control System]
WARNING:
-
Handling the SAS control module or air bag module improperly can accidentally deploy the air bag modules and pre-tensioner seat belts, which may seriously injure you. Read the air bag system service warnings and cautions before handling the air bag module..
-
If the connector is connected and the ignition switch is turned to the ON position with the SAS control module not secured completely using the installation nuts, the SAS control module may detect a degree of impact even when something contacts it lightly, deploying the air bag module and pre-tensioner seat belt accidentally.
-
If the DSC sensor initialization procedure is not completed, it could result in an unexpected accident due to the DSC being inoperative. Therefore, after the SAS control module is replaced, always perform the DSC sensor initialization procedure to ensure proper DSC operation.
-
If configuration is not performed when the SAS control module is replaced with a new one, the vehicle specification information is not stored in the SAS control module and the system will not operate normally.
CAUTION:
-
When replacing the SAS control module, always perform the configuration procedure before removing the SAS control module. If the configuration is not performed and the SAS control module is removed, DTC B0003:53 will be displayed.
-
When performing configuration, it is necessary to read the vehicle specification information from the SAS control module before replacing it. Connect the M-MDS to the vehicle and perform vehicle identification before removing the SAS control module. The vehicle specification information is temporarily stored in the M-MDS.
NOTE:
-
The SAS control module prior to replacement stores the vehicle specification information.
-
A new SAS control module does not store any vehicle specification information.
-
If the vehicle specification information from the SAS control module prior to replacement cannot be read, perform the configuration using As-Built data.
1. When replacing the SAS control module, perform the configuration..
2. Switch the ignition off.
3. Disconnect the negative battery cable and wait for 1 min or more
..
4. Remove the following parts:
a. Front console box.
b. Shift lever knob (MTX).
c. Shift panel.
d. Upper panel.
e. Rear console.
5. Set the parking brake lever out of the way..
6. Disconnect the connectors.
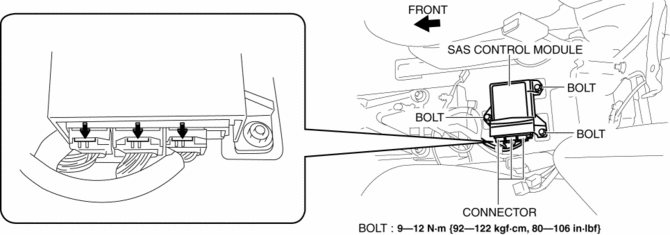
7. Remove the bolts.
8. Remove the SAS control module.
9. Install in the reverse order of removal.
10. Switch the ignition ON (engine off or on).
11. Verify that the air bag system warning light illuminates for approx. 6 s
and goes out.
-
If the air bag system warning light does not operate normally, refer to the on-board diagnostic system (air bag system) and perform inspection of the system..
12. Perform the DSC sensor initialization procedures..
NOTE:
-
If configuration cannot be performed by reading/writing of the vehicle specification information, perform the configuration using As-Built information after replacing the SAS control module..
 Sas Control Module Configuration (Using Read/Write Function) [Standard Deployment
Control System]
Sas Control Module Configuration (Using Read/Write Function) [Standard Deployment
Control System]
NOTE:
When performing configuration, it is necessary to read the vehicle specification
information from the SAS control module before replacing it. Connect the M-MDS
to the vehicle and p ...
 Sas Control Module [Standard Deployment Control System]
Purpose
The SAS control module controls the air bag system operation.
Function
During a frontal collision, the SAS control module controls the following
air bag module operation ...
Other materials:
Piston, Piston Ring, Piston Pin
Purpose, Function
Piston
The piston in the cylinder of the cylinder block moves reciprocally by the
pressure received when the air-fuel mixture combusts.
Piston ring
The piston ring consists of the compression ring (top ring, second ring)
and the oil ring, and has the foll ...
Seat Weight Sensor Inspection [Two Step Deployment Control System]
CAUTION:
If any of the following work is performed, perform the seat weight sensor
inspection using the M-MDS.
Removal of the passenger-side seat
Loosening and retightening of passenger’s seat fixing bolts
Or, the vehicle is involved in a collision
...
Fuel Filler Cap
Purpose, Function
Releases evaporative gas from the fuel tank if there is a malfunction in
the evaporative gas passage between the fuel tank and the intake manifold. As
a result, deformation of the fuel tank caused by evaporative gas pressure is
prevented.
Construction
T ...
