Mazda CX-5 Service & Repair Manual: Refrigerant Pressure Sensor Removal/Installation [Full Auto Air Conditioner]
1. Disconnect the negative battery cable..
2. Discharge the refrigerant..
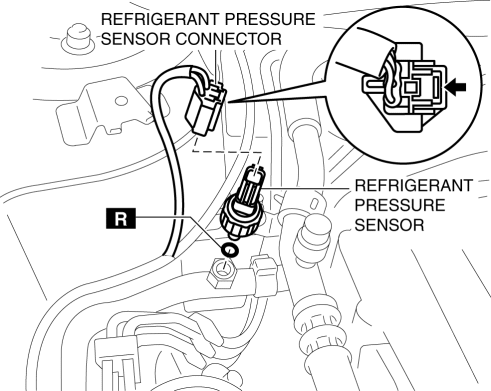
3. Disconnect the refrigerant pressure sensor connector.
CAUTION:
-
If moisture or foreign material enters the refrigeration cycle, cooling ability will be lowered and abnormal noise will occur. Always immediately plug all open fittings after removing any refrigeration cycle parts to keep moisture or foreign material out of the cycle.
4. Loosen the refrigerant pressure sensor using two spanners.
5. Remove the refrigerant pressure sensor.
-
Tightening torque
-
10—11 N·m {102—112 kgf·cm, 89—97 in·lbf}
6. Install in the reverse order of removal..
7. Perform the refrigerant system performance test..
Refrigerant Pressure Sensor Installation Note
1. Apply compressor oil to the O-rings and connect the joints.
 Refrigerant Pressure Sensor Inspection [Manual Air Conditioner]
1. Install the manifold gauge.
2. Verify the high-pressure side reading of the manifold gauge.
3. Measure the terminal voltage at PCM terminals 2BB, 2AX and 2AJ
4. Using the graph below, measure ...
 Refrigerant Pressure Sensor Removal/Installation [Manual Air Conditioner]
1. Disconnect the negative battery cable..
2. Discharge the refrigerant..
3. Disconnect the refrigerant pressure sensor connector.
CAUTION:
If moisture or foreign material enters the ref ...
Other materials:
Fuel Gauge Sender Unit Removal/Installation [2 Wd]
WARNING:
Always keep sparks and flames away from fuel when servicing the fuel system.
Fuel can be easily ignited which could cause serious injury or death, and damage
to equipment.
Fuel line spills and leakage from the pressurized fuel system are dangerous.
Fuel can ignite a ...
Steering Gear And Linkage Assembly
CAUTION:
To prevent damage to the steering gear, secure it to the vise using a copper
plate or clean cloth.
1. Assemble in the order shown in the figure.
1
Steering gear
2
Mounting rubber
(See Mounting Rubber Assembly Not ...
Push Button Start Removal/Installation
1. Disconnect the negative battery cable..
2. Remove the meter hood..
3. While pressing the push button start tab in the direction of the arrow (1)
shown in the figure, push out the push button start in the direction of the arrow
(2) shown in the figure to detach the push button start tab fr ...
