
Mazda CX-5 Service & Repair Manual: Power Window Motor Inspection
Front driver side
1. Disconnect the negative battery cable..
2. Remove the inner garnish..
3. Remove the front door trim..
4. Disconnect the power window motor connector.
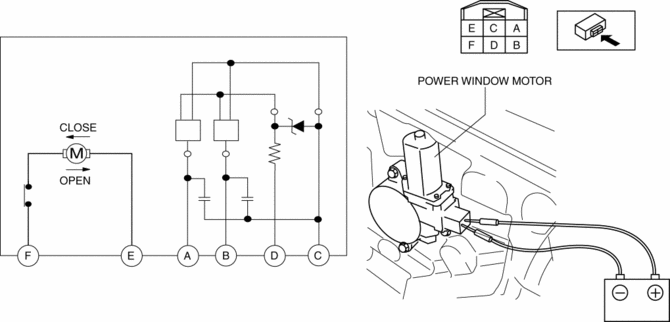
5. Apply battery positive voltage and connect the ground to power window motor terminals E and F, and then inspect the power window motor operation.
-
If the power window motor does not operate as indicated in the table, replace it.
|
Operation |
Terminal |
|
|
E |
F |
|
|
Open |
B+ |
Ground |
|
Close |
Ground |
B+ |
6. Connect the battery positive voltage to power window motor terminal D and connect terminal C to ground.
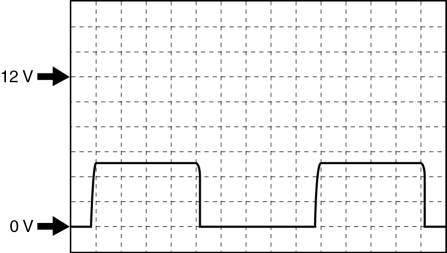
7. Operate the power window motor and verify the wave patterns for terminals A and B.
-
Terminal:
A, B(+) - ground (-)
-
Oscilloscope setting: 2 V/DIV (Y), 1 ms/DIV (X), DC range
-
If the malfunction, replace the power window motor.
Front passenger side
1. Disconnect the negative battery cable..
2. Remove the inner garnish..
3. Remove the front door trim..
4. Disconnect the power window motor connector.
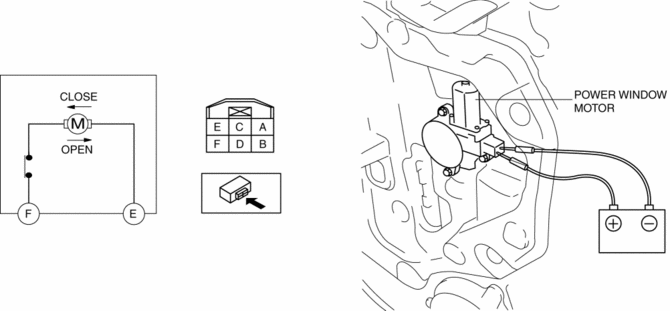
5. Apply battery positive voltage and connect the ground to power window motor terminals E and F, and then inspect the power window motor operation.
-
If the power window motor does not operate as indicated in the table, replace it.
|
Operation |
Terminal |
|
|
E |
F |
|
|
Close |
B+ |
Ground |
|
Open |
Ground |
B+ |
Rear
1. Disconnect the negative battery cable..
2. Remove the rear door trim.
3. Disconnect the power window motor connector.
4. Apply battery positive voltage and connect the ground to power window motor terminals E and F, and then inspect the power window motor operation.
-
If the power window motor does not operate as indicated in the table, replace it.
|
Operation |
Terminal |
|
|
E |
F |
|
|
Close |
B+ |
Ground |
|
Open |
Ground |
B+ |
 Power Window Motor
Purpose
The power window motor transmits rotation force to the power window regulator
to open/close the door glass.
Function
The power window motor rotates clockwise/counterclockwise when it rece ...
 Power Window Motor Removal/Installation
Front Power Window Motor
1. Fully lower the front door glass.
2. Disconnect the negative battery cable..
3. Remove the inner garnish..
4. Remove the front door trim..
5. Disconnect the front ...
Other materials:
Seat Belt Warning Light
Purpose
The seat belt warning light warns the driver that a seat belt is not fastened.
Function
The instrument cluster flashes/illuminates the seat belt warning light based
on the following CAN signals:
Vehicle speed signal sent from PCM
Driver/passenge ...
Washer Nozzle
Purpose
The washer nozzle sprays the washer fluid sent from the washer motor to the
optimum positions on the windshield.
Construction
A ball-shaped spray orifice is set inside the washer nozzle which can be
adjusted up or down.
The washer nozzle is moved u ...
Windshield Washer Nozzle Removal/Installation
1. Remove the following parts:
a. Windshield wiper arm and blade.
b. Cowl grille.
2. Disconnect the windshield washer hose from the windshield washer nozzle..
3. While pressing windshield washer nozzle tabs in the direction of the arrow
(1) shown in the figure, pull the windshield washer ...
