Mazda CX-5 Service & Repair Manual: Refrigerant Pressure Check
NOTE:
-
Measure the refrigerant pressure after approx.10 min
have elapsed from engine start.
1. Install the manifold gauge..
2. Start the engine and warm it up.
3. Set the fan speed MAX HI.
4. Turn the A/C switch on.
5. Set to RECIRCULATE mode.
6. Set the temperature control to MAX COLD.
7. Set to VENT mode.
8. Close all the doors and all the windows.
9. Maintain the engine speed at 1,500 rpm
.
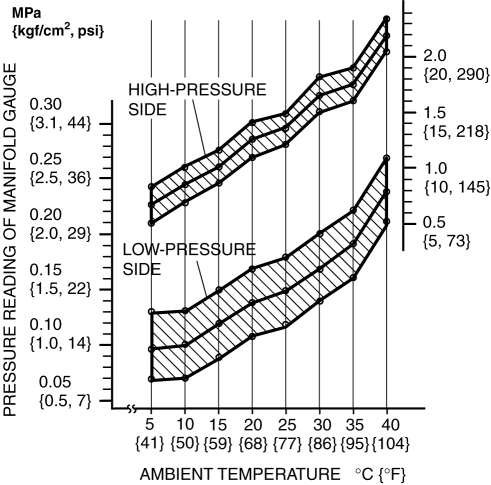
10. Measure the ambient temperature and high- and low- pressure side reading of the manifold gauge.
11. Verify that the intersection of the pressure reading of the manifold gauge and ambient temperature is in the shaded zone.
-
If there is any malfunction, inspect the refrigerant system according to the troubleshooting chart.
 Refrigerant Line Removal/Installation
1. Disconnect the negative battery cable..
2. Discharge the refrigerant..
3. Disconnect the engine ground.
4. Disconnect the refrigerant pressure sensor connector.
5. Remove in the order i ...
 Refrigerant Pressure Sensor Inspection [Full Auto Air Conditioner]
1. Install the manifold gauge.
2. Verify the high-pressure side reading of the manifold gauge.
3. Measure the terminal voltage at PCM terminal 2BB, 2AX and 2AJ
4. Using the graph below, measure ...
Other materials:
Side Step Molding Removal/Installation
1. Set the rear over fender aside..
2. Insert a tape-wrapped flathead screwdriver shown in the figure and remove
the clip A in the direction of arrow (1).
3. Slide the side step molding in the direction of the arrow (2) shown in the
figure and remove clips B from side step molding.
4. ...
Antenna Feeder No.1 Removal/Installation
With audio system
1. Disconnect the negative battery cable..
2. Remove the following parts:
a. Side speaker grille (RH).
b. Tweeter (RH).
c. A-pillar trim.
d. Passenger-side front scuff plate.
e. Passenger-side front side trim.
f. Glove compartment.
g. Decoration panel.
h. Dashboa ...
Charcoal Canister Inspection
U.S.A. And CANADA
Leakage inspection
1. Perform the following procedures:
Do not operate CV solenoid valve.
Assemble the hose used for inspection to port A.
Cover ports B and C with the caps.
CAUTION:
Do not apply a pressure 20 kPa {150 mmHg, 5.91 inHg} o ...
