Mazda CX-5 Service & Repair Manual: Refrigerant Pressure Sensor Removal/Installation [Full Auto Air Conditioner]
1. Disconnect the negative battery cable..
2. Discharge the refrigerant..
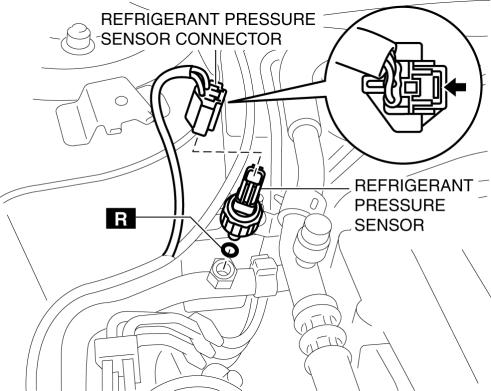
3. Disconnect the refrigerant pressure sensor connector.
CAUTION:
-
If moisture or foreign material enters the refrigeration cycle, cooling ability will be lowered and abnormal noise will occur. Always immediately plug all open fittings after removing any refrigeration cycle parts to keep moisture or foreign material out of the cycle.
4. Loosen the refrigerant pressure sensor using two spanners.
5. Remove the refrigerant pressure sensor.
-
Tightening torque
-
10—11 N·m {102—112 kgf·cm, 89—97 in·lbf}
6. Install in the reverse order of removal..
7. Perform the refrigerant system performance test..
Refrigerant Pressure Sensor Installation Note
1. Apply compressor oil to the O-rings and connect the joints.
 Refrigerant Pressure Sensor Inspection [Full Auto Air Conditioner]
1. Install the manifold gauge.
2. Verify the high-pressure side reading of the manifold gauge.
3. Measure the terminal voltage at PCM terminal 2BB, 2AX and 2AJ
4. Using the graph below, measure ...
 Refrigerant Pressure Sensor Removal/Installation [Manual Air Conditioner]
1. Disconnect the negative battery cable..
2. Discharge the refrigerant..
3. Disconnect the refrigerant pressure sensor connector.
CAUTION:
If moisture or foreign material enters the ref ...
Other materials:
Master Cylinder Removal/Installation
1. Remove the battery..
2. Remove in the order indicated in the table.
3. Install in the reverse order of removal.
4. After installation, add brake fluid, bleed the air, and inspect for fluid
leakage..
1
Brake fluid level sensor connector
2
...
Inspection Of SST (Deployment Tool) [Two Step Deployment Control System]
1. Before using the SST (49 H066 002), inspect its operation.
Inspection Procedure
1. Follow the steps below to inspect the SST (49 H066 002).
If not as indicated in the table, replace the SST (49 H066 002) because
it has a malfunction.
WARNING:
Do not use a malfu ...
Rear Wiper And Washer Switch Inspection
1. Disconnect the negative battery cable..
2. Remove the following parts:
a. Column cover.
b. Wiper and washer switch.
3. Use a tester to measure and verify that the continuity between the rear wiper
and washer switch terminals is as indicated in the table.
If the continuity is ...
