Mazda CX-5 Service & Repair Manual: Rear Window Defroster/Outer Mirror Heater
Outline
-
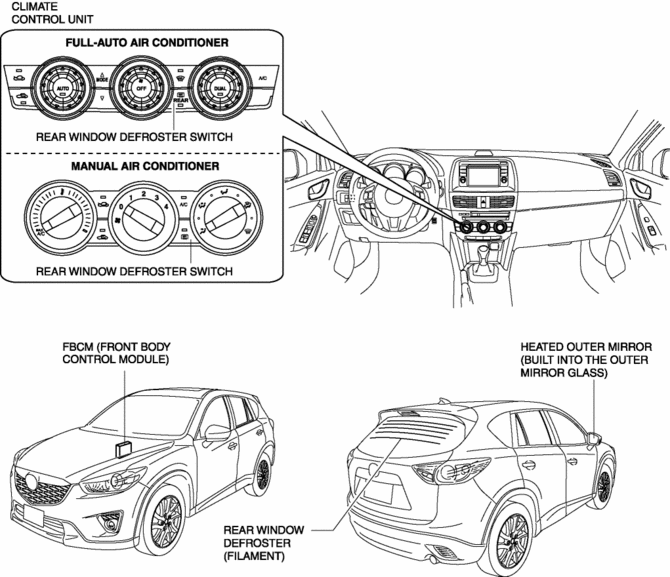
Fogging is cleared from the rear window and outer mirror glass by heating of the filament.
Structural view
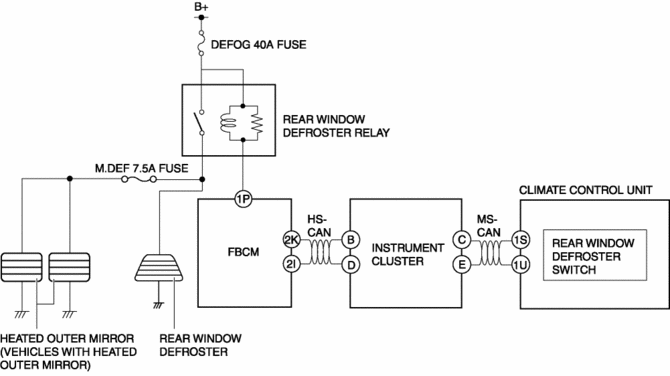
System wiring diagram
Vehicles with full-auto air conditioner system
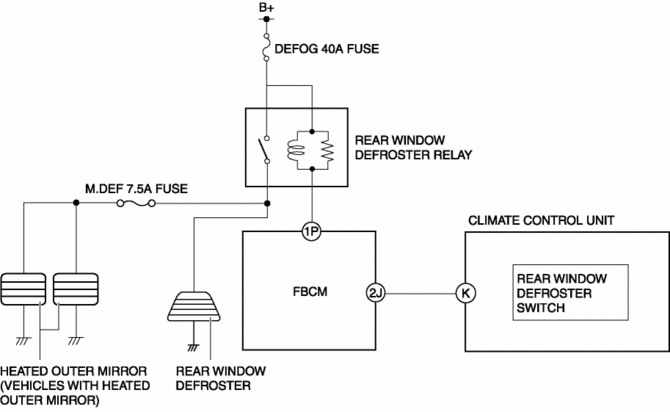
Vehicles with manual air conditioner system
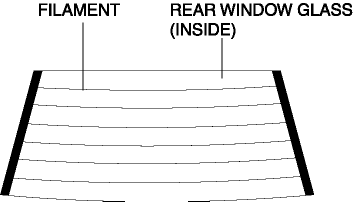
Construction
Rear window defroster
-
The rear window defroster filament is inside the rear window glass.
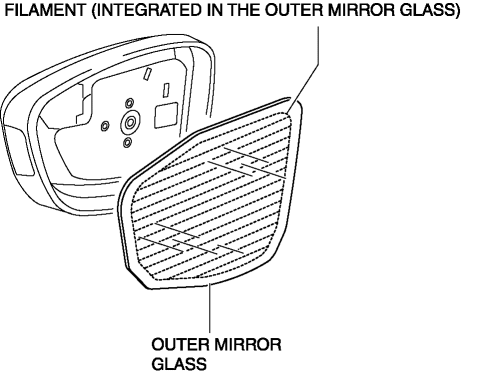
Heated outer mirror
-
The heated outer mirror filament is integrated in the outer mirror glass.
Operation
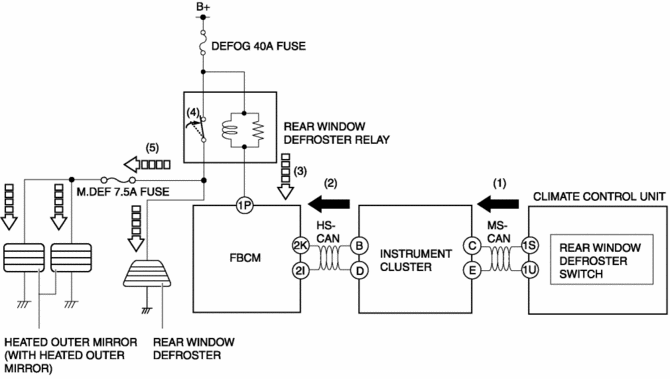
Vehicles with full-auto air conditioner system
1. When the rear window defroster switch on the climate control unit is turned on (1), an ON/OFF control request signal is sent to the front body control module (FBCM) through the instrument cluster as a CAN signal.(2)
2. When the front body control module (FBCM) receives the ON/OFF control request signal, it supplies the battery voltage to the rear window defroster relay.(3)
3. When the battery voltage is supplied to the rear window defroster relay, a switch inside the rear window defroster relay is turned on.(4)
4. When the switch inside the rear window defroster relay is turned on, the battery voltage is supplied to the rear window defroster/heated outer mirrors to operate them.(5)
-
When approx. 15 min.
has elapsed after the rear window defroster switch was turned on, the timer control of the front body control module (FBCM) turns off the rear window defroster relay automatically to turn off the rear window defroster/heated outer mirror.
-
When the rear window defroster switch is pressed while the rear window defroster/heated outer mirrors are operating, they stop operating.
Vehicles with manual air conditioner system
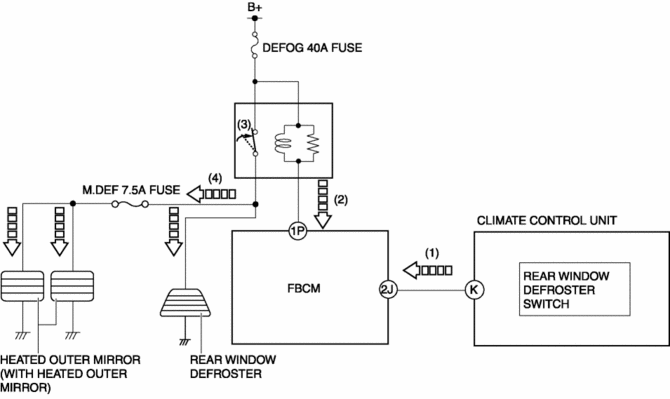
1. When the rear window defroster switch on the climate control unit is turned on (1), a signal is sent from the climate control unit to the front body control module (FBCM) and the battery voltage is supplied to the rear window defroster relay.(2)
2. When the battery voltage is supplied to the rear window defroster relay, a switch inside the rear window defroster relay is turned on.(3)
3. When the switch inside the rear window defroster relay is turned on, the battery voltage is supplied to the rear window defroster/heated outer mirrors to operate them.(4)
-
When approx. 15 min.
has elapsed after the rear window defroster switch was turned on, the timer control of the front body control module (FBCM) turns off the rear window defroster relay automatically to turn off the rear window defroster/heated outer mirror.
-
When the rear window defroster switch is pressed while the rear window defroster/heated outer mirrors are operating, they stop operating.
Fail-safe
-
Function not equipped
 Rear Power Window Regulator Removal/Installation
1. Fully lower the rear door glass.
2. Disconnect the negative battery cable..
3. Remove the following parts:
a. Rear door trim.
b. Rear door quarter glass.
c. Rear door speaker.
d. Rear p ...
 Rear Window Glass Installation
WARNING:
Using a utility knife with bare hands can cause injury. Always wear gloves
when using a utility knife.
CAUTION:
Proper installation of the glass may be difficult if s ...
Other materials:
Oil Control Valve (OCV) [Skyactiv G 2.0]
Purpose, Function
The OCV switches the oil passage to the hydraulic variable valve timing actuator
to control the opening/closing period of the exhaust valve.
Construction
The OCV is installed to the exhaust camshaft cap (No.1).
The OCV consists of a spool valve wh ...
Fresh Air Duct
Purpose, Function
Conducts fresh air from outside the engine compartment.
Increases air density by taking fresh air, which is cooler than the engine
compartment, to enhance the charging efficiency, ensuring the combustion stability.
Construction
The fresh-air duct is i ...
Washer Fluid Level Sensor Removal/Installation
1. Disconnect the negative battery cable..
2. Set the front over fender aside..
3. Set the mudguard (RH) aside..
4. Remove the front bumper..
5. Disconnect the washer fluid-level sensor connector.
6. Remove the washer fluid-level sensor.
NOTE:
If the washer fluid-level sensor ...
