
Mazda CX-5 Service & Repair Manual: Rear Shock Absorber Removal/Installation
1. Remove in the order indicated in the table.
2. Install in the reverse order of removal.
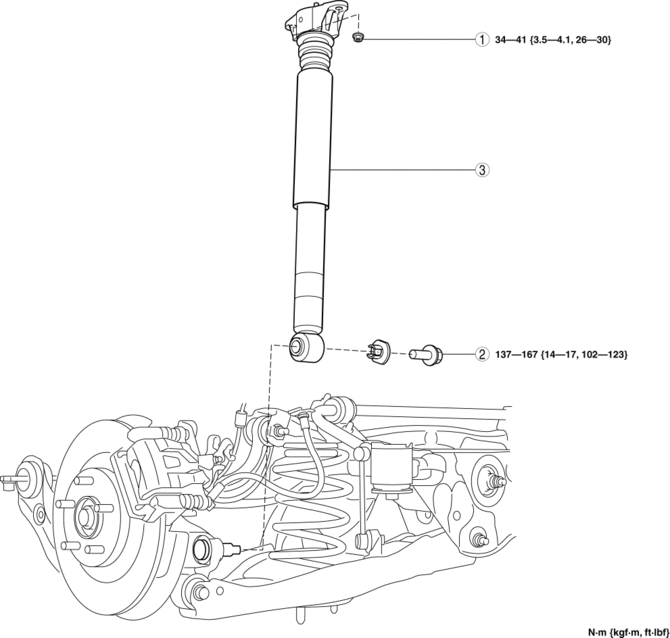
|
1 |
Rear shock absorber upper nut (See Rear Shock Absorber Upper nut Installation Note.) |
|
2 |
Rear shock absorber lower bolt |
|
3 |
Rear shock absorber |
Rear Shock Absorber Upper nut Installation Note
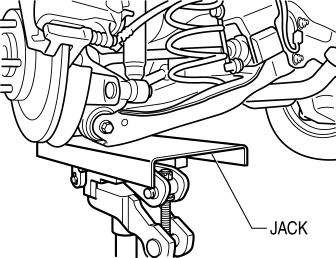
1. Lift up the rear lower arm using a jack and install the rear shock absorber upper nuts.
 Rear Shock Absorber Inspection
1. Remove the rear shock absorber..
2. Inspect for damage and oil leakage.
3. Compress and extend the shock piston at least three times. Verify that the
operational force does not change and tha ...
 Rear Stabilizer Control Link Inspection
1. Remove the rear stabilizer control link..
2. Inspect for bending or damage. If there is any malfunction, replace the rear
stabilizer control link.
3. Rotate the ball joint stud 10 times and s ...
Other materials:
Power Window Motor Inspection
Front driver side
1. Disconnect the negative battery cable..
2. Remove the inner garnish..
3. Remove the front door trim..
4. Disconnect the power window motor connector.
5. Apply battery positive voltage and connect the ground to power window motor
terminals E and F, and then inspect the ...
Oil Control Valve (OCV) [Skyactiv G 2.0]
Purpose, Function
The OCV switches the oil passage to the hydraulic variable valve timing actuator
to control the opening/closing period of the exhaust valve.
Construction
The OCV is installed to the exhaust camshaft cap (No.1).
The OCV consists of a spool valve wh ...
Fuel Draining Procedure
WARNING:
Fuel line spills and leakage from the pressurized fuel system are dangerous.
Fuel can ignite and cause serious injury or death and damage. To prevent this,
complete the following inspection with the engine stopped.
Fuel is very flammable liquid. If fuel spills or leaks ...
