Mazda CX-5 Service & Repair Manual: Rear Lower Arm Removal/Installation
WARNING:
-
Be careful not to allow the coil spring to fly off when removing/installing the coil spring. Otherwise, the coil spring could fly off and cause serious injury or death, or damage to the vehicle.
1. When working on the left side of the vehicle, disconnect the auto leveling sensor link..
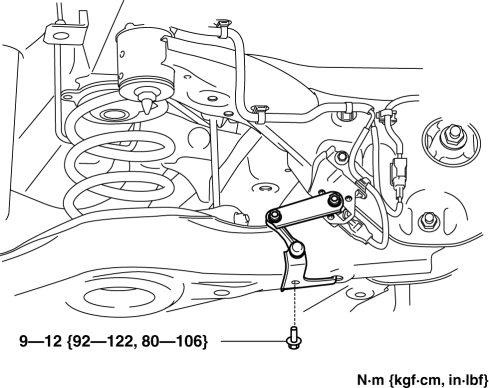
2. Remove in the order indicated in the table.
3. Install in the reverse order of removal.
4. Inspect the wheel alignment and adjust it if necessary..

|
1 |
Rear stabilizer control link lower side nut (See REAR STABILIZER REMOVAL/INSTALLATION [2WD].) (See REAR STABILIZER REMOVAL/INSTALLATION [AWD].) |
|
2 |
Rear lower arm outer bolt (See Rear Lower Arm Outer Bolt Removal Note.) (See Rear Lower Arm Outer Bolt Installation Note.) |
|
3 |
Rear coil spring component (See REAR COIL SPRING REMOVAL/INSTALLATION.) |
|
4 |
Rear lower arm inner nut |
|
5 |
Rear lower arm |
Rear Lower Arm Outer Bolt Removal Note
1. Support the rear lower arm using a jack.
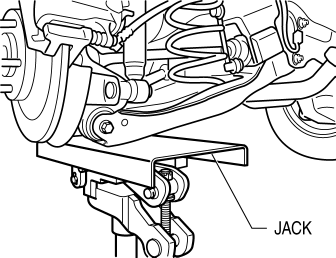
2. Remove the rear lower arm outer bolt.
Rear Lower Arm Outer Bolt Installation Note
1. Position the jack under the rear lower arm and jack up slowly.
2. Align the upper end of the rear coil spring with the step of the upper spring seat rubber.
3. Align the lower end of the rear coil spring with the step of the lower spring seat rubber.
4. Install the lower arm outer bolt.
 Rear Lateral Link Removal/Installation
1. Disconnect the rear stabilizer control link lower side nut..
2. Remove in the order indicated in the table.
3. Install in the reverse order of removal.
4. Inspect the wheel alignment an ...
 Rear Shock Absorber Disposal
WARNING:
Whenever drilling into a rear shock absorber, wear protective eye wear. The
gas in the rear shock absorber is pressurized, and could spray metal chips into
the eyes and face w ...
Other materials:
Rear Window Wiper and Washer
The ignition must be switched ON.
Rear WindowWiper
Turn the wiper on by turning the rear wiper/washer switch.
Rear WindowWasher
To spray washer fluid, turn the rear wiper/ washer switch to the
position. After the switch is released,
the washer will stop.
If the washer does not work, ins ...
Rear Body Control Module (Rbcm) Removal/Installation
CAUTION:
If configuration is not performed when the rear body control module (RBCM)
is replaced with a new one, the vehicle specification information is not stored
in the rear body control module (RBCM) and the system will not operate normally.
When performing configuration, it ...
Control System [Manual Air Conditioner]
Outline
Refrigerant pressure sensor adopted in which refrigerant pressure is changed
into a linear electric signal and precise information is transmitted.
Climate control unit with enlarged operation dials and switches adopted
Structural View
System Wiring Diagram
...
