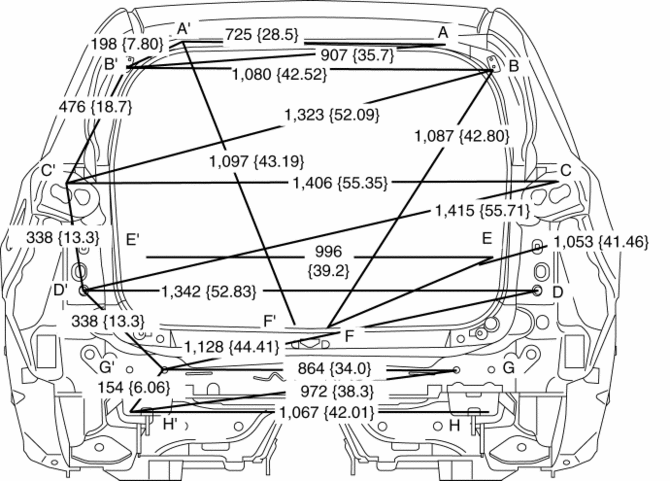
Mazda CX-5 Service & Repair Manual: Rear Body Straight Line Dimensions (1) [Dimensions]
|
Point symbol |
Designation |
Hole diameter or bolt or nut size mm {in} |
|
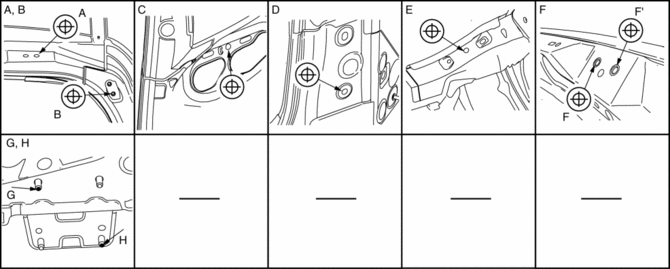
A |
Liftgate hinge installation hole |
?12 {0.47} |
|
B |
Liftgate stay damper installation hole |
?10 {0.39} |
|
C |
Rear combination light installation slot |
?10 {0.39} |
|
D |
Rear end panel datum bolt |
?12 {0.347 |
|
E |
Brace bracket datum hole |
?10 {0.39} |
|
F |
Liftgate striker installation hole |
?14 {0.55} |
|
G |
Rear bumper reinforcement installation bolt |
M10 |
|
H |
Rear bumper reinforcement installation bolt |
M10 |
 Front Side Frame Removal [Panel Replacement]
Symbol Mark
Removal Procedure
1. Drill the 15 locations indicated by (A) shown in the figure.
2. Drill the 4 locations indicated by (B) shown in the figure.
NOTE:
When drilling the 4 ...
 Rear Crossmember Removal/Installation [2 Wd]
WARNING:
Verify that the rear crossmember is securely supported by a jack. If the
rear crossmember falls off, it can cause serious injury or death, and damage
to the vehicle.
CAUTI ...
Other materials:
Not P Position Switch Inspection
NOTE:
The not P position switch is built into the selector lever component.
1. Disconnect the negative battery cable..
2. Remove the front console..
3. Disconnect the selector lever component connector.
4. Verify that the continuity between selector lever component terminals ...
Fuel Gauge Sender Unit Inspection [Awd]
Fuel gauge sender unit (main)
NOTE:
For the fuel gauge sender unit removal/installation, refer to the fuel pump
removal/installation because the fuel gauge sender unit is integrated with the
fuel pump..
1. Verify that the resistance at fuel gauge sender unit (main) terminals D a ...
Fuses
Your vehicle's electrical system is protected by fuses.
If any lights, accessories, or controls do not work, inspect the appropriate
circuit protector. If a fuse has blown, the inside element will be melted.
If the same fuse blows again, avoid using that system and consult an Authorized
Ma ...
