Mazda CX-5 Service & Repair Manual: Powertrain System Outline [Fw6 A EL, Fw6 Ax EL]
Outline
-
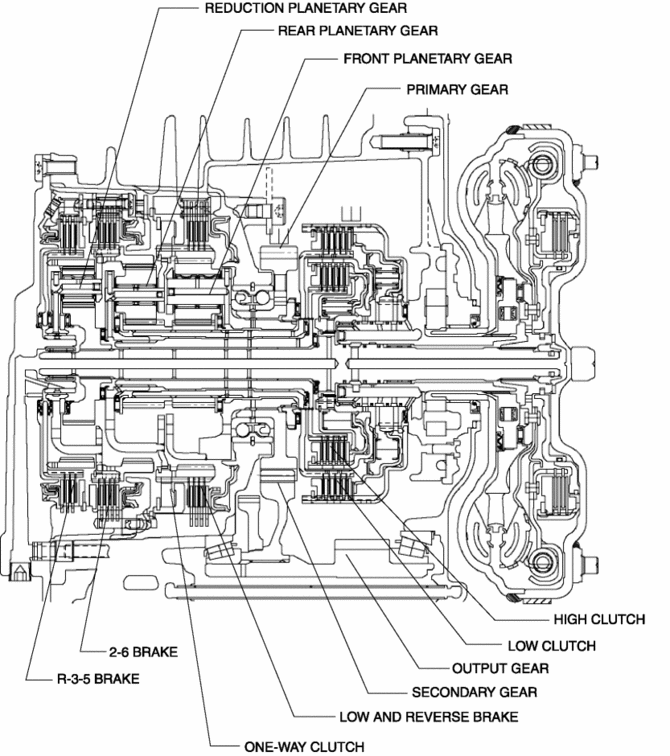
The powertrain consists of a 2-piece multi-plate clutch, 3-piece multi-plate brake, a one-way clutch, and a 3-piece single-type planetary gear.
Construction
Component parts list
|
Component parts |
Movement |
|
|
Multi-plate clutch |
Low clutch |
Transmits drive force from turbine shaft to front and rear sun gears |
|
High clutch |
Transmits drive force from turbine shaft to rear planetary carrier |
|
|
Multi-plate brake |
R-3-5 brake |
Locks reduction internal gear against rotation |
|
2-6 brake |
Locks rear internal gear and reduction planetary gear against rotation |
|
|
Low and reverse brake |
Locks front internal gear and rear planetary gear against rotation |
|
|
One-way clutch |
Restricts counterclockwise rotation (when viewed from torque converter side) of front internal gear |
|
|
Single type planetary gear |
Front planetary gear |
Converts drive force transmitted from engine by operation of each clutch and brake, and transmits it to primary gear. (Operates transaxle.) |
|
Rear planetary gear |
||
|
Reduction planetary gear |
||
Cross-sectional view
Skeleton diagram
 Power Flow [Fw6 A EL, Fw6 Ax EL]
Power flow
1 GR
2 GR
3 GR
4 GR
5 GR
6 GR
REVERSE
...
 Powertrain System [C66 M R]
Purpose, Function
The powertrain mechanism changes the gear combination by engaging or releasing
the clutch hub and gear, and changes the power transmission route. Because of
the change i ...
Other materials:
Rear Body Control Module (Rbcm) Configuration (Using Read/Write Function)
NOTE:
When performing configuration, it is necessary to read the vehicle specification
information from the rear body control module (RBCM) before replacing it. Connect
the M-MDS to the vehicle and perform vehicle identification before removing
the rear body control module (RBCM). T ...
Limitations to SRS Air Bag
In severe collisions such as those described previously in “SRS Air Bag Deployment
Criteria”, the applicable SRS air bag equipment will deploy. However, in some accidents,
the equipment may not deploy depending on the type of collision and its severity.
Limitations to front/near front colli ...
Fresh Air Duct
Purpose, Function
Conducts fresh air from outside the engine compartment.
Increases air density by taking fresh air, which is cooler than the engine
compartment, to enhance the charging efficiency, ensuring the combustion stability.
Construction
The fresh-air duct is i ...
