Mazda CX-5 Service & Repair Manual: Positive Crankcase Ventilation (PCV) Valve Removal/Installation
1. Disconnect the negative battery cable..
2. Remove the intake manifold..
3. Remove in the order indicated in the table.
4. Install in the reverse order of removal.
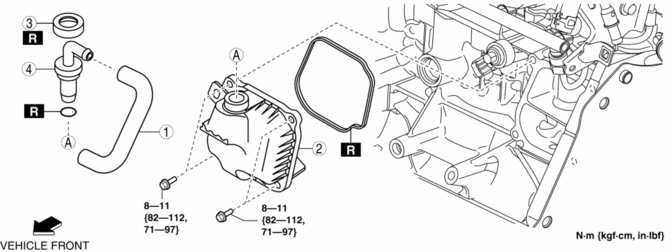
|
1 |
PCV hose |
|
2 |
Oil separator |
|
3 |
Retainer (See Retainer Removal Note.) (See Retainer Installation Note.) |
|
4 |
PCV valve |
Retainer Removal Note
CAUTION:
-
Be sure to follow the removal procedures below to prevent the leakage of blow-by gas caused by the damage to the tab of the oil separator or the oil separator itself.
1. Insert a flat blade screwdriver with its tip wrapped in a shop rag into the gap between the retainer and the oil separator as shown in the figure.
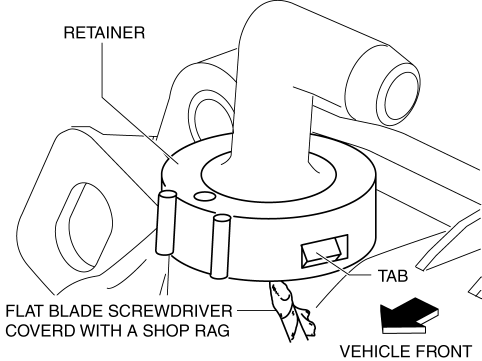
2. Spread the side surface of the retainer outward to dismount it with attention to the tab.
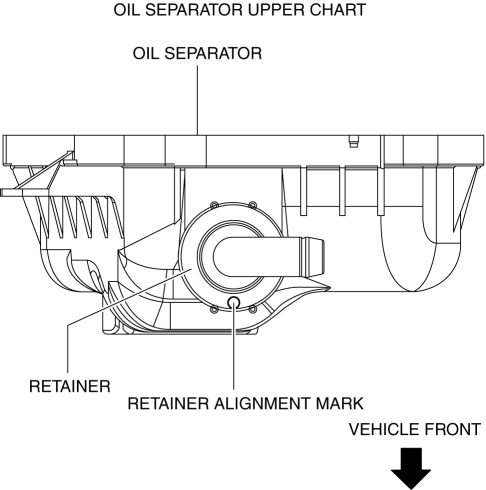
Retainer Installation Note
CAUTION:
-
Be sure to replace the old retainer with a new one to prevent the escape of blow-by gas. Reinstalling the old retainer will reduce airtightness.
1. Make sure that the retainer alignment mark is directed as shown in the left diagram before installing the retainer to the oil separator.
 Positive Crankcase Ventilation (PCV) Valve Inspection
Airflow Inspection
1. Disconnect the section (A) of ventilation hose shown in the figure.
2. Start the engine and verify that vacuum is applied to the end of the disconnected
ventilation hose ...
 Positive Crankcase Ventilation (PCV) Valve
Purpose, Function
Prevents release of blow-by gas (unburnt gas) into the atmosphere.
The PCV valve is open/closed by the intake manifold vacuum.
Construction
The PCV valve ...
Other materials:
Construction Standard Values [Construction Standard Values]
Front view
No.
Measurement part
Standard values (mm {in})
Maximum values (mm {in})
Minimum values (mm {in})
Side by difference (mm {in})
A
1
5.0
{0.20}
7.0
{ ...
Air Bag System Service Cautions [Two Step Deployment Control System]
Air Bag System Component Disassembly
Disassembling the air bag system components could cause it to not operate
(deploy) normally. Never disassemble any air bag system components.
Air Bag Module, Pre-tensioner Seat Belt, Lap Pre-tensioner Seat Belt Handling
Oil, grease, or ...
Crash Zone Sensor Removal/Installation [Standard Deployment Control System]
WARNING:
Handling the crash zone sensor improperly can accidentally deploy the air
bags and pre-tensioner seat belts, which may seriously injure you. Read the
air bag system service warnings and cautions before handling the crash zone
sensor..
1. Switch the ignition to off.
...
