Mazda CX-5 Service & Repair Manual: Oil Filter Replacement
WARNING:
-
Hot engines and engine oil can cause severe burns. Turn off the engine and wait until it and the engine oil have cooled.
-
A vehicle that is lifted but not securely supported on safety stands is dangerous. It can slip or fall, causing death or serious injury. Never work around or under a lifted vehicle if it is not securely supported on safety stands.
-
Continuous exposure to USED engine oil has caused skin cancer in laboratory mice. Protect your skin by washing with soap and water immediately after working with engine oil.
CAUTION:
-
If engine oil is spilled on the exhaust system, wipe it off completely. If you fail to wipe the spilled engine oil, it will produce fumes because of the heat.
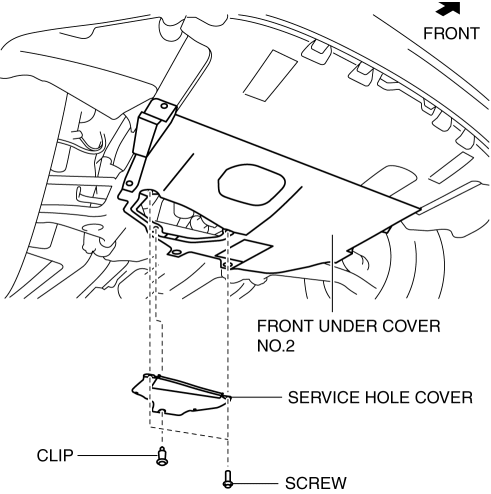
1. Remove the service hole cover (installed to front under cover No.2) used to remove the oil filter.

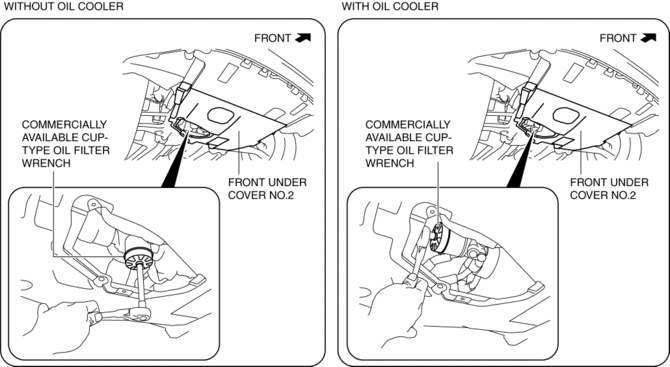
2. Remove the oil filter using the commercially available, cup-type oil filter wrench (67 mm {2.6 in} diameter, 14 sided
).

3. Use a clean rag to wipe off the mounting surface.
4. Apply clean engine oil to the O-ring of a new oil filter.
5. Tighten the oil filter according to the instructions on the package or side of the oil filter.
-
Tightening torque (reference value)
-
12—16 N·m {123—163 kgf·cm, 107—141 in·lbf}
6. Start the engine and confirm that there is no oil leakage.
-
If there is oil leakage, repair or replace the applicable part.
7. Inspect the oil level..
8. Install the service hole cover.
 Oil Cooler
Purpose, Function
The oil cooler routes engine oil and engine coolant through the interior
and disperses the engine oil heat using the engine coolant. As a result, the
oil temperature is ...
 Oil Filter
Purpose, Function
Engine oil is filtered by passing engine oil through the oil filter element.
Construction
The oil filter is installed on the right side surface of the cylinder bl ...
Other materials:
Camshaft Position (CMP) Sensor
Purpose/Function
Detects the camshaft speed as basic information for mainly determining the
fuel injection timing and ignition timing.
Detects the camshaft speed and inputs it to the PCM as a CMP signal.
Construction
Intake CMP sensor
Installed on the cylinder head.
...
Blind Spot Monitoring (Bsm) Off Switch Inspection
1. Disconnect the negative battery cable..
2. Remove the BSM OFF switch..
3. Verify that the resistance between BSM OFF switches B and C is as indicated
in the table.
If the resistance cannot be verified as indicated in the table, replace the
cluster switch.
4. Apply batte ...
Rear Seat Back Removal/Installation
CAUTION:
When removing or putting in the rear seat, contact with the surrounding areas
of the vehicle could cause scratches and damage. When removing or putting in
the rear seat, always use two or more persons to perform the work and be careful
not to scratch or damage the rear seat ...
