Mazda CX-5 Service & Repair Manual: Liftgate Side Trim Removal/Installation
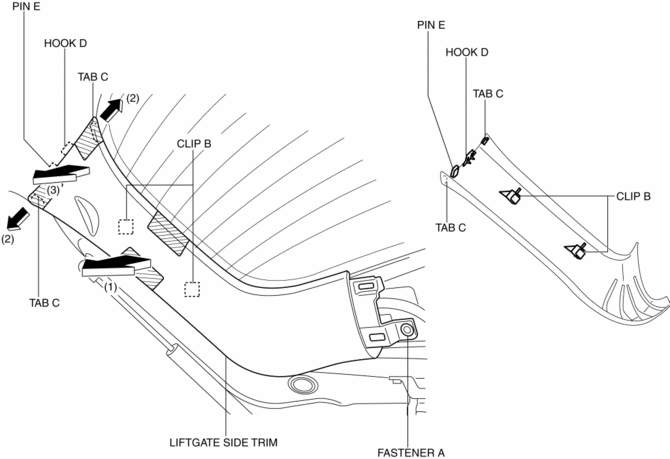
1. Remove the liftgate upper trim..
2. Remove the fastener A.
3. Take the shaded area shown in the figure, and pull the liftgate side trim in the direction of the arrow (1) while detaching clips B.

4. Take the shaded area shown in the figure, detach tabs C while pulling the liftgate side trim in the direction of the arrow (2) shown in the figure, then detach the hook D, pin E while pulling in the direction of the arrow (3).
5. Install in the reverse order of removal.
 Liftgate Removal/Installation
WARNING:
Removing the stay damper, liftgate hinge securing bolt, or liftgate without
supporting the liftgate may cause the liftgate to fall off and injure you. When
removing the stay dam ...
 Liftgate Upper Trim Removal/Installation
1. Take the shaded area shown in the figure, detach tab A while pulling the liftgate
upper trim in the direction of the arrow (1) shown in the figure, then detach clips
B, clip C and pin D while p ...
Other materials:
Seat Warmer Control Unit Removal/Installation
WARNING:
Handling a side air bag improperly can accidentally operate (deploy) the
air bag, which may seriously injure you. Read the service warnings/cautions
in the Workshop Manual before handling the front seat (side air bag integrated)..
1. Switch the ignition off (LOCK).
2. ...
Front Fog Light
Purpose
By shining light in a wider area in front of the vehicle than the light from
the headlights, visibility during poor weather conditions, such as rain and
fog, has been improved. In addition, the visibility of the vehicle from on-coming
vehicles, pedestrians, and other people h ...
Operating Tips
Operate the climate control system with the engine running.
• To prevent the battery from being discharged,
do not leave the fan control dial on for a long period of time with the ignition
switched ON when the engine is not running.
• Clear all obstructions such as leaves, snow
and ice f ...
