Mazda CX-5 Service & Repair Manual: Front Fog Light
Purpose
-
By shining light in a wider area in front of the vehicle than the light from the headlights, visibility during poor weather conditions, such as rain and fog, has been improved. In addition, the visibility of the vehicle from on-coming vehicles, pedestrians, and other people has been improved.
Function
-
Illuminates according to the light switch and front fog light switch operation.
Construction
-
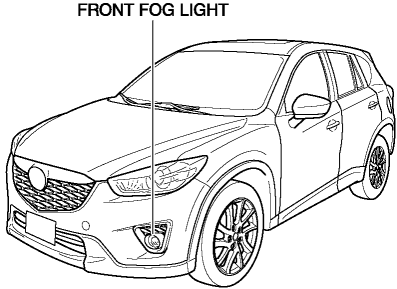
Round-type fog lights are installed to the front bumper.
-
Clear lenses have been adopted to the front fog lights.
Operation
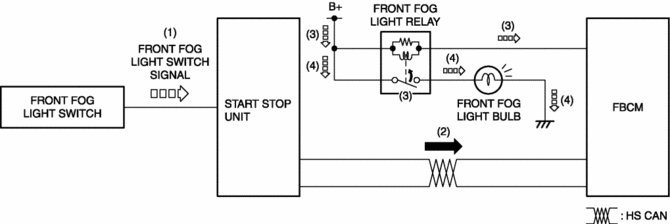
1. With the light switch in the TNS, HEAD, or HI position, a front fog light switch signal is sent to the start stop unit when the front fog light switch is operated to the on position.
2. The start stop unit sends the front fog light switch signal to the front body control module (FBCM).
3. When the front body control module (FBCM) receives the fog light switch signal, it turns the front fog light relay on.
4. When the front fog light relay turns on, the front fog light bulb illuminates.
Fail-safe
-
Function not equipped.
 Front Combination Light Removal/Installation
WARNING:
Incorrect servicing of the discharge headlights could result in electrical
shock. Before servicing the discharge headlights, always refer to the service
warnings..
NOTE:
...
 Front Fog Light Aiming
NOTE:
Perform front fog light aiming if any of the following work is performed.
Front fog light replacement
Work that can affect vehicle height such as suspension repla ...
Other materials:
Front Fog Light Removal/Installation
1. Disconnect the negative battery cable..
2. Remove the screws and bolt.
3. Pull up the front under cover No.1 and remove the mudguard screw shown in
the figure.
4. Disconnect the connector.
5. While pressing the clip tab in the direction of the arrow (1) shown in the
figure ...
Oil Pan Removal/Installation
WARNING:
Hot engines and engine oil can cause severe burns. Turn off the engine and
wait until it and the engine oil have cooled.
A vehicle that is lifted but not securely supported on safety stands is dangerous.
It can slip or fall, causing death or serious injury. Never work ...
PID/Data Monitor Inspection [Standard Deployment Control System]
1. Connect the M-MDS to the DLC?2.
2. After the vehicle is identified, select the following items from the initialization
screen of the M-MDS.
a. Select “DataLogger”.
b. Select “Modules”.
c. Select “RCM”.
3. Select the applicable PID from the PID table.
4. Verify the PID da ...
