Mazda CX-5 Service & Repair Manual: Side Air Bag Module Removal/Installation [Standard Deployment Control System]
WARNING:
-
Handling the air bag module improperly can accidentally operate (deploy) the air bag module, which may seriously injure you. Read the air bag system service warnings and cautions before handling the air bag module..
-
If the side air bag module is installed with debris in the seat back, the foreign material may be scattered when the side air bag module operates (deploys), causing injury. Verify that there is no foreign material in the seat back before installing the side air bag module.
1. Switch the ignition to off.
2. Disconnect the negative battery cable and wait for 1 min or more
..
3. Remove the front seat..
4. Remove the seat back trim and the seat back pad..
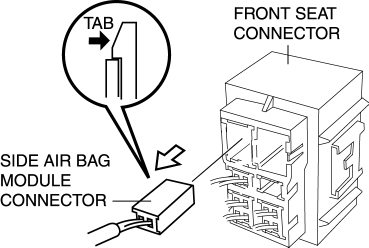
5. Disconnect the side air bag module connector.
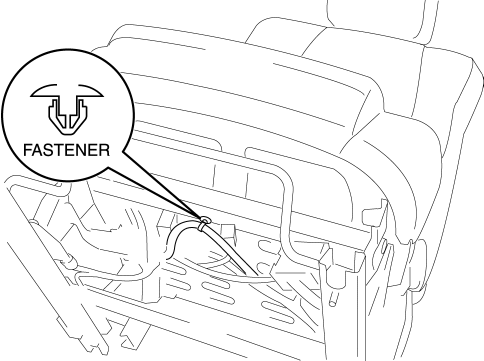
6. Remove the fastener.
7. Remove the nuts.
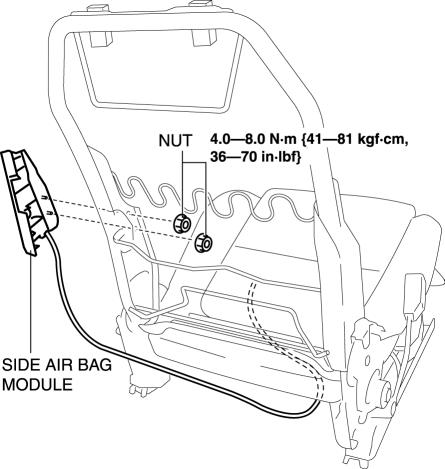
8. Remove the side air bag module.
9. Install in the reverse order of removal.
10. Switch the ignition ON (engine off or on).
11. Verify that the air bag system warning light illuminates for approx. 6 s
and goes out.
-
If the air bag system warning light does not operate normally, refer to the on-board diagnostic system (air bag system) and perform inspection of the system..
 Seat Weight Sensor Removal/Installation [Two Step Deployment Control System]
CAUTION:
When the seat weight sensor is replaced with a new one, perform the seat
weight sensor calibration using the M?MDS..
When replacing the seat weight sensor, replace it t ...
 Side Air Bag Module [Standard Deployment Control System]
Purpose
When a side air bag module receives an impact from a lateral collision, the
operation (deployment) of the air bag mediates the impact to the chest, stomach,
and waist of the drive ...
Other materials:
Generator [Skyactiv G 2.0]
Purpose, Function
The generator operates by obtaining drive force from the engine via the drive
belt and generates the required electricity for electronic devices.
Construction
The generator is installed on the engine left front side.
Output control is perfor ...
Remote Handle Lever Removal/Installation
1. Disconnect the negative battery cable..
2. Remove the following parts:
a. Trunk board.
b. Trunk end trim.
c. Rear scuff plate.
d. Trunk side trim.
3. Disconnect the remote cable on the remote handle lever side from the remote
cable on the rear seat side.
4. Remove the remote c ...
Quick Release Connector Removal/Installation
WARNING:
Fuel is very flammable liquid. If fuel spills or leaks from the pressurized
fuel system, it will cause serious injury or death and facility breakage. Fuel
can also irritate skin and eyes. To prevent this, always complete the “Fuel
Line Safety Procedure”, while referring ...
