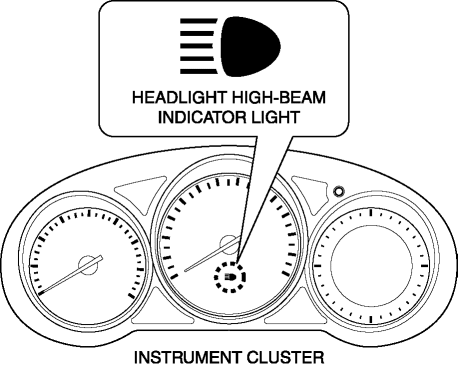
Mazda CX-5 Service & Repair Manual: Headlight High Beam Indicator Light
Purpose
-
Notifies the user that the headlights (HI) are illuminated.
Function
-
Illuminates when the headlight (HI) or parking illumination conditions are met.
Construction
-
Displayed in the instrument cluster.
Operation
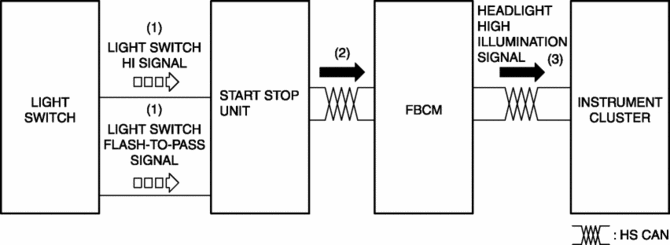
1. When the light switch is operated to the HI or parking position, a light switch HI or parking signal is input to the start stop unit.
2. The start stop unit sends the light switch HI or parking signal to the front body control module (FBCM).
3. The front body control module (FBCM) sends the light switch HI signal to the instrument cluster as a headlight HI illumination signal.
4. When the instrument cluster receives the headlight HI illumination signal, it illuminates the headlight high-beam indicator light.
Fail-safe
-
Function not equipped.
 Headlight Bulb Removal/Installation
Halogen Type
Headlight LO bulb
1. Disconnect the negative battery cable..
2. Disconnect the connector.
3. Rotate the headlight LO bulb in the direction of the arrow (1) shown in the
figure ...
 Headlight Leveling Actuator
Purpose, Function
The headlight leveling actuator drives the motor based on the target optical
axis voltage, which is input from the AFS control module, to change the optical
axis of the ...
Other materials:
Refrigerant System Service Cautions
Handling Insufficient Refrigerant Level
If an insufficient refrigerant level is detected at troubleshooting, do
not charge (add) the refrigerant. Because an accurate amount of refrigerant
cannot be determined from the pressure indicated on the manifold gauge, never
charge the refrige ...
Ignition Switch
Push Button Start Positions
The system operates only when the driver is in the vehicle or within operational
range while the key is being carried.
Each time the push button start is pressed, the ignition switches in the order
of off, ACC, and ON. Pressing the push button start again from ON sw ...
Steering Column And Shaft
Purpose/Function
The steering input force, generated when the driver operates the steering
wheel, is transmitted to the steering gear.
Construction
The steering column and shaft consists of the steering column with a built-in
EPS mechanism and the intermediate shaft.
...
