Mazda CX-5 Service & Repair Manual: Glove Compartment Removal/Installation
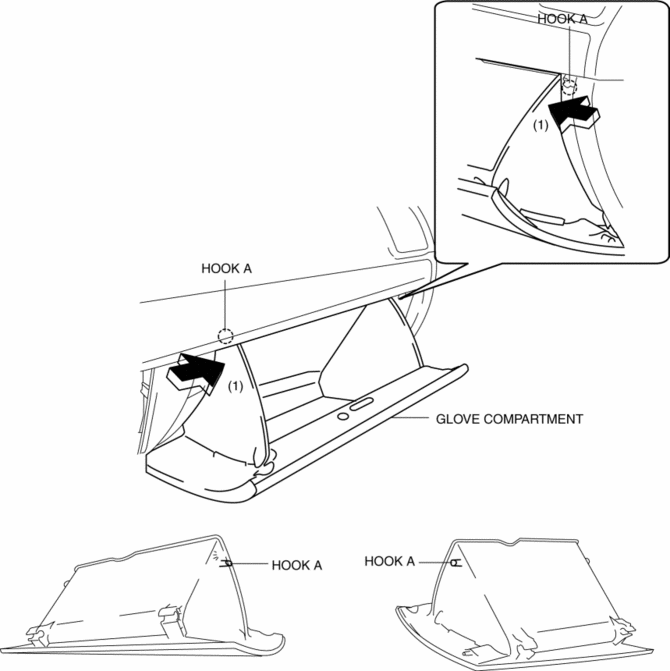
1. Push the glove compartment in the direction of the arrow (1) and remove hooks A.
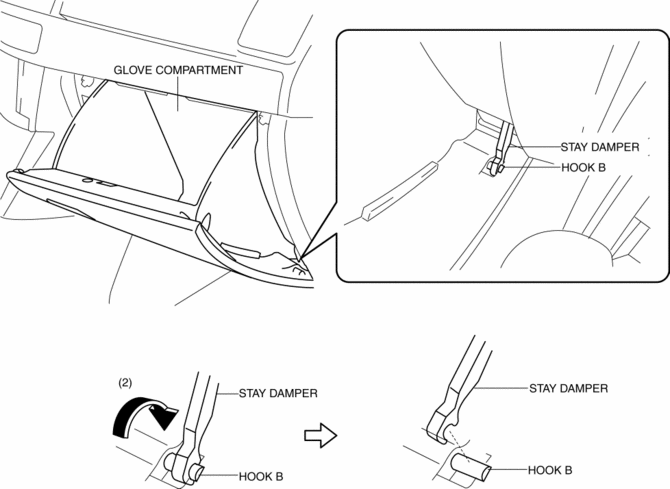
2. Pull the stay damper in the direction of the arrow (2) shown in the figure and remove the hook B.
CAUTION:
-
If the glove compartment is closed without being joined to the stay damper, the stay damper may be damaged. Verify that the stay damper is joined to the glove compartment before closing the glove compartment.
3. Pull down the glove compartment in the direction of the arrow (3).
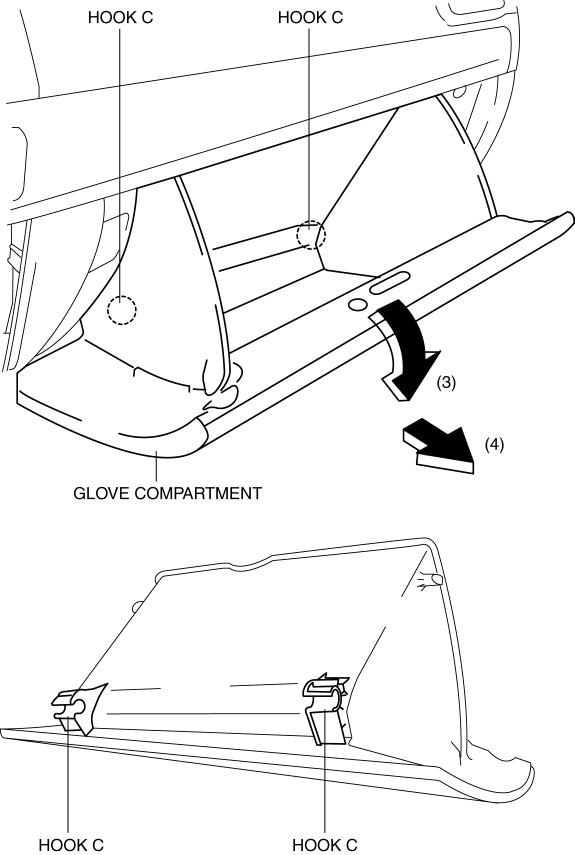
4. Pull the glove compartment in the direction of the arrow (4) and remove it while detaching hooks C.
5. Install in the reverse order of removal.
 Front Console Removal/Installation
CAUTION:
Affix protective tape to the position shown in the figure.
1. Disconnect the negative battery cable..
2. Remove the following parts:
a. Decoration panel.
b. Shift l ...
 Knee Bolster Removal/Installation
1. Disconnect the negative battery cable..
2. Remove the following parts:
a. Driver-side front scuff plate.
b. Driver-side front side trim.
c. Switch panel.
d. Decoration panel.
e. Shift l ...
Other materials:
Rear Accessory Socket Removal/Installation
1. Disconnect the negative battery cable..
2. Insert a tape-wrapped flathead screwdriver into the service hole in the position
shown in the figure.
3. Move the flathead screwdriver in the direction of the arrow (1) shown in the
figure, pull out the service hole cover, and detach the serv ...
Dashboard Removal/Installation
1. Disconnect the negative battery cable..
2. Remove the following parts:
a. Windshield wiper arm and blade.
b. Cowl grille.
c. Windshield wiper motor.
d. Front scuff plate.
e. Front side trim.
f. Glove compartment.
g. Dashboard under cover.
h. Decoration panel.
i. Center panel. ...
Brakes SST
49 F043 002
Wrench
49 U043 004A
Oil pressure gauge
(Part of 49 U043 0A0A)
49 U043 005
Joint
(Part of 49 U043 0A0A)
49 U043 006
Hose
(Part of 49 U043 0A0A)
...
