Mazda CX-5 Service & Repair Manual: Generator [Skyactiv G 2.0]
Purpose, Function
-
The generator operates by obtaining drive force from the engine via the drive belt and generates the required electricity for electronic devices.
Construction
-
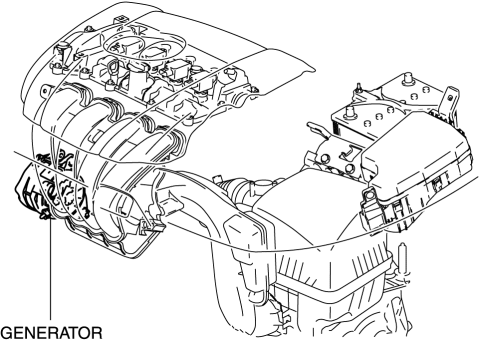
The generator is installed on the engine left front side.
-
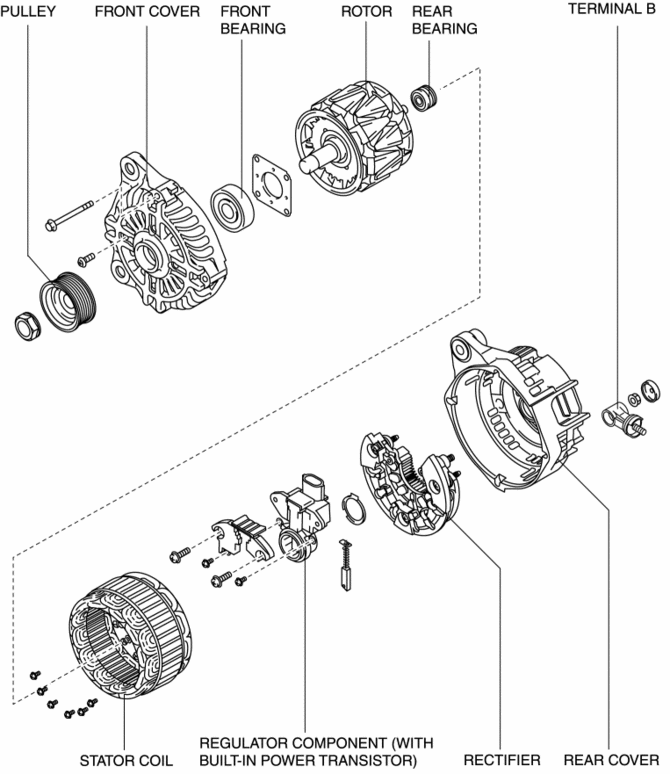
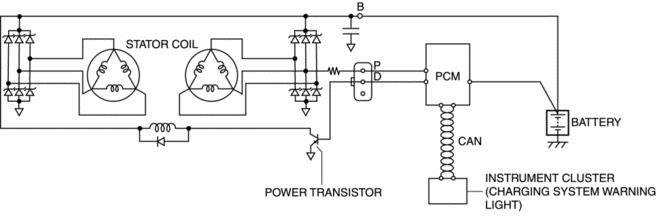
Output control is performed by the PCM resulting in the elimination of the IC regulator and the simplification of the construction.
-
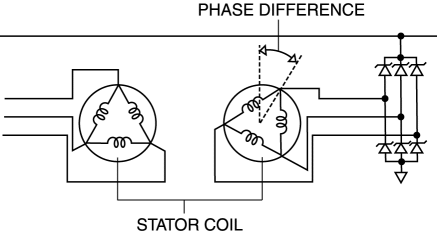
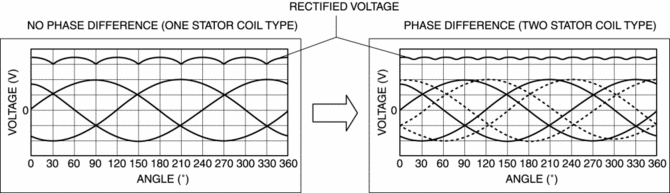
Two delta connection type stator coils have been adopted.
-
The two stator coils form the circuit having a phase difference, and magnetic pull, which operates between the rotor and stator coil by the phase difference, is theoretically eliminated. Due to this, electromagnetic vibration and generator operation noise (electromagnetic noise) have been reduced.
-
Pulsation occurring through voltage rectifying using two stator coils having a phase difference is minimized and stable voltage output is supplied.
Operation
-
For generator control details, refer to CONTROL SYSTEM..
Fail-safe
-
Function not equipped.
 Generator Removal/Installation [Skyactiv G 2.0]
WARNING:
Remove and install all parts when the engine is cold, otherwise they can
cause severe burns or serious injury.
When the battery cables are connected, touching the vehic ...
 Refrigerant Charging
CAUTION:
Do not use a different type of refrigerant or charge beyond the specified
level. Otherwise, cooling ability will be lowered and the A/C compressor could
be damaged.
Chargi ...
Other materials:
Manifold Absolute Pressure (Map) Sensor/Intake Air Temperature (Iat) Sensor
No.2 Removal/Installation
NOTE:
Because the IAT sensor No.2 is integrated in the MAP sensor, replacing the
IAT sensor No.2 includes replacement of the MAP sensor/IAT sensor No.2.
1. Disconnect the negative battery cable..
2. Disconnect the MAP sensor/IAT sensor No.2 connector.
3. Remove the MAP sensor/IA ...
Torque Converter [Fw6 A EL, Fw6 Ax EL]
Purpose/Function
By use of an optimized torus shape (wing) matching the output characteristics
of the engine, the torque converter achieves efficient force transmission and
reduced fuel consumption.
Construction/Operation
A three-member, single-stage two-phase type torque c ...
Oil Control Valve (OCV) Inspection
Coil Resistance Inspection
1. Disconnect the negative battery cable..
2. Remove the plug hole plate..
3. Disconnect the OCV connector.
4. Measure the resistance between terminals A and B using an ohmmeter.
OCV coil resistance
6.9—7.5 ohms [20°C {68°F}]
If not as ...
