
Mazda CX-5 Service & Repair Manual: General Procedures (Brake)
Wheel and Tire Installation
1. When installing the wheels and tires, tighten the wheel nuts in a criss-cross pattern to the following tightening torque.
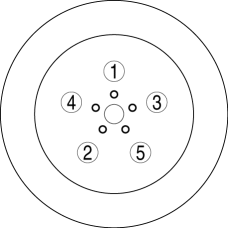
-
Tightening torque
-
108—147 N·m {12—14 Kgf·m, 80—108 ft·lbf}
Brake Lines Disconnection
1. If any brake line has been disconnected during the procedures, add brake fluid, bleed the brakes, and inspect for leakage after the procedure has been completed.
CAUTION:
-
Brake fluid will damage painted surfaces. Be careful not to spill any on painted surfaces. If it is spilled, wipe it off immediately.
Brake Pipe Flare Nut Tightening
1. Tighten the brake pipe flare nut using any commercially available flare nut wrench.
Connector Disconnection
1. Disconnect the negative battery cable before performing any work that requires handling of connectors..
DSC Related Parts
1. Make sure that there are no DTCs in the DSC memory after working on DSC related parts. If there are any DTCs in the memory, clear them..
DSC Related Part Sensor Initialization Procedure
WARNING:
-
If the initialization procedure is not completed, the DSC will not operate properly and it might cause an unexpected accident. Therefore, when replacing or removing the following parts, make sure to perform the initialization procedure to insure proper DSC operation.
1. When replacing or removing the following parts, perform the initialization procedure..
-
DSC HU/CM
Tire Pressure Monitoring System Initialization Procedure
CAUTION:
-
If the tire pressure monitoring system initialization procedure is performed with the tire pressures not to specification, the system may not operate normally. Therefore, always inspect and adjust the tire pressure of all 4 tires before performing the tire pressure monitoring system initialization procedure.
NOTE:
-
Perform the tire pressure monitoring system initialization when the following operations have been performed:.
-
Tire pressures have been adjusted
-
Tires or wheels have been replaced
-
Tires have been rotated
-
DSC HU/CM replaced
-
DSC HU/CM connector disconnected
-
Battery replaced
-
Negative battery cable is disconnected
1. Perform the tire pressure monitoring system initialization procedure when the tire pressure monitoring system warning light illuminates..
 Disc Pad (Rear) Replacement
1. Remove in the order indicated in the table.
2. Install in the reverse order of removal.
3. After installation, pump the brake pedal a few times and inspect the following:
The disc pad ...
 Low And Reverse Brake [Fw6 A EL, Fw6 Ax EL]
Purpose/Function
The low and reverse brake stops the rotation of the front internal gear and
rear planetary carrier while in 1GR and in reverse, locking them to the transaxle
case.
...
Other materials:
Crankshaft Position (CKP) Sensor
Purpose/Function
Detects the crankshaft speed as basic information for mainly determining
the fuel injection timing and ignition timing.
Detects the crankshaft speed and inputs it to the PCM as a CKP signal.
Construction
Installed on the side of the cylinder block (ri ...
Fuel Filler Cap
Purpose, Function
Releases evaporative gas from the fuel tank if there is a malfunction in
the evaporative gas passage between the fuel tank and the intake manifold. As
a result, deformation of the fuel tank caused by evaporative gas pressure is
prevented.
Construction
T ...
Power Window Motor
Purpose
The power window motor transmits rotation force to the power window regulator
to open/close the door glass.
Function
The power window motor rotates clockwise/counterclockwise when it receives an
open/close signal from the power window main switch or the power window subswitch.
Constr ...
