Mazda CX-5 Service & Repair Manual: Front Side Frame (Partial Cutting) Installation [Panel Replacement]
Symbol Mark

Installation Procedure
CAUTION:
-
The cut and joint area indicates the maximum size range of the installation position.
1. Drill holes for the plug welding before installing the new parts.
2. When installing the new parts, trial-fit new and existing parts, and then measure and adjust the body to conform with standard dimensions.
3. Cut and join location indicated by (A) shown in the figure.
4. Plug weld the 3 locations indicated by (B) shown in the figure, then install the front side frame (outer).

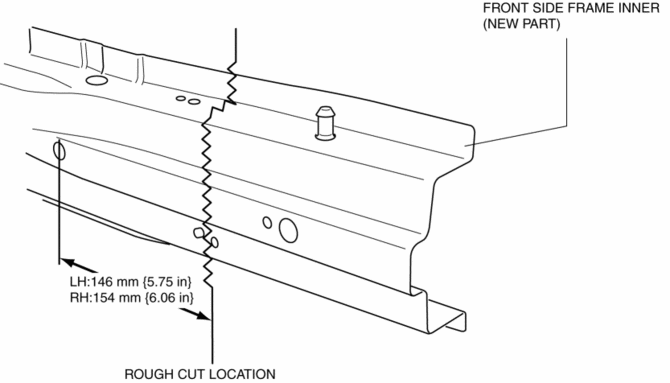
5. To cut and join the new and existing parts, rough cut the new part at the specified location shown in the figure, and chamfer the joint surfaces of the new and existing parts.
6. Make a reinforcement panel using the material from the front side frame (inner).
7. Plug weld the 4 locations indicated by (B) shown in the figure, then install the reinforcement to the new front side frame (inner).
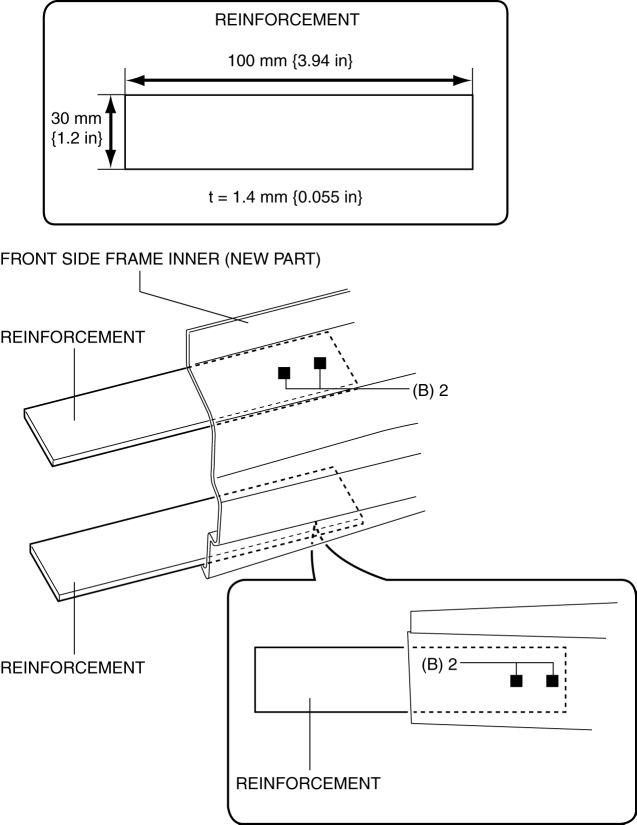
8. Plug weld the 3 locations indicated by (C) shown in the figure.
NOTE:
-
Press fit the reinforcement panel and the body side material, and then weld them.
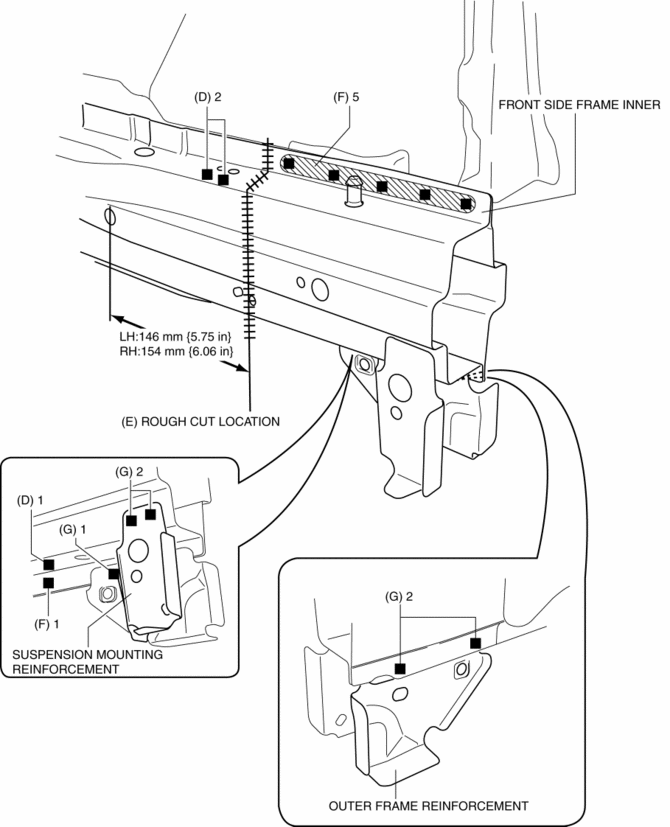
9. Cut and location indicated by (D) shown in the figure.
10. Plug weld the 6 locations indicated by (E) shown in the figure, then install the front side frame inner.
11. Plug weld the 5 locations indicated by (F) shown in the figure, then install suspension mounting reinforcement and outer frame reinforcement.
 Front Seat Cushion Frame Removal/Installation
WARNING:
Handling a side air bag improperly can accidentally operate (deploy) the
air bag, which may seriously injure you. Read the service warnings/cautions
in the Workshop Manual befor ...
 Front Side Frame (Partial Cutting) Removal [Panel Replacement]
Symbol Mark
Removal Procedure
1. Drill the 4 locations indicated by (A) shown in the figure, then remove suspension
mounting reinforcement and outer frame reinforcement.
2. Rough cut locatio ...
Other materials:
Towing
Trailer Towing (U.S.A. and Canada)
Your Mazda was designed and built primarily to carry passengers and cargo.
If you tow a trailer, follow these instructions because driver and passenger
safety depends on proper equipment and safe driving habits. Towing a trailer will
affect handling, braking, ...
Energy Absorbing Form Removal/Installation
1. Disconnect the negative battery cable..
2. Remove the seal board upper..
3. Remove the front bumper..
4. Insert the flathead screwdriver shown in the figure, push fasteners A for
back side of front bumper reinforcement arrow shown in the figure.
5. Pull the energy-absorbing form in ...
Positive Crankcase Ventilation (PCV) Valve
Purpose, Function
Prevents release of blow-by gas (unburnt gas) into the atmosphere.
The PCV valve is open/closed by the intake manifold vacuum.
Construction
The PCV valve is installed to the oil separator.
The PCV valve consists of a spring and valve.
...
