Mazda CX-5 Service & Repair Manual: Rear Door Checker Removal/Installation
1. Fully close the rear door glass.
2. Disconnect the negative battery cable..
3. Remove the rear door trim..
4. Remove the rear door speaker..
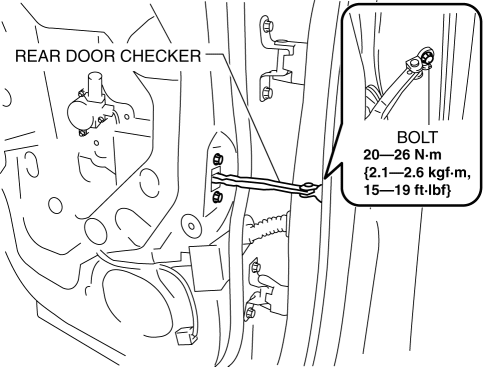
5. Remove bolt.
6. Remove nuts.
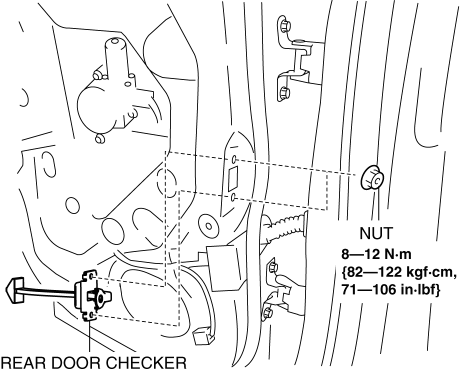
7. Pull out the rear door checker from the rear speaker installation hole.
8. Install in the reverse order of removal.
 Meter Hood Removal/Installation
1. Disconnect the negative battery cable..
2. Remove the upper column cover.
3. Using a phillips screwdriver, remove fasteners.
NOTE:
When pulling up the shaft of fasteners using a phill ...
 Rear Door Garnish Removal/Installation
WARNING:
Using a utility knife with bare hands can cause injury. Always wear gloves
when using a utility knife.
Front
1. Using a tape-wrapped fastener remover, remove clips A in the ...
Other materials:
Power Outer Mirror
Outline
The power outer mirror adjusts the outer mirror glass position up/down and
left/right using the up/down adjustment motor and, left/right adjustment motor.
The up/down adjustment motor and, left/right adjustment motor turns clockwise
(down/right direction) or counterclock ...
Shift Lock System Inspection
Shift-Lock System Inspection
1. Switch the ignition ON (engine off).
2. Shift the selector lever to the P position.
3. Verify that the selector lever cannot be shifted from P to R position when
the brake pedal is released.
If it can be verified, go to the next step.
If not as ...
Glass Antenna Inspection
1. Disconnect the negative battery cable..
2. Partially peel back the seaming welt.
3. Remove the liftgate upper trim..
4. Disconnect antenna feeder No.3 connector..
5. Visually inspect the glass antenna for damage.
6. Verify that the continuity between the glass antenna terminals is as in ...
