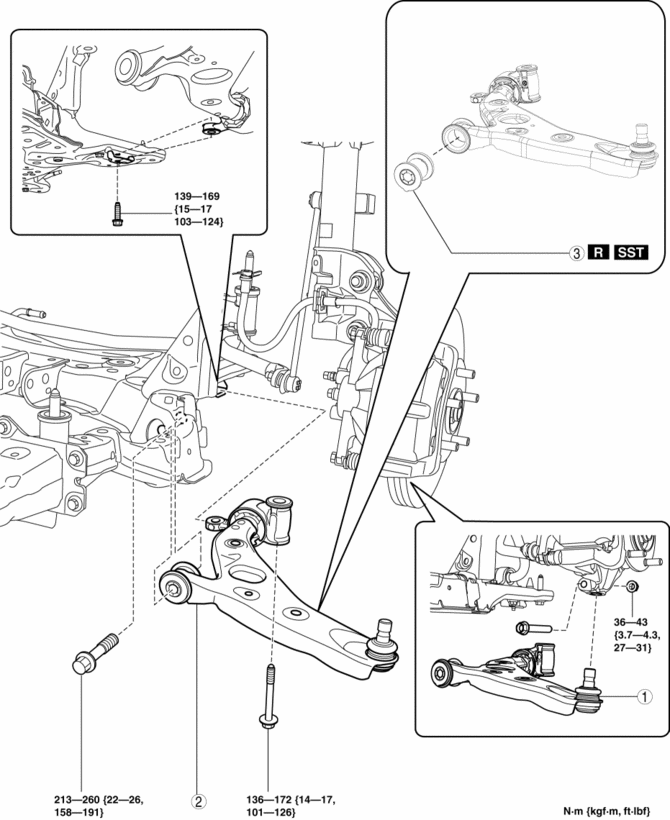
Mazda CX-5 Service & Repair Manual: Front Lower Arm Removal/Installation
1. Remove the front under cover No.2..
2. Remove in the order indicated in the table.
3. Install in the reverse order of removal.
4. Inspect the wheel alignment and adjust it if necessary..
|
1 |
Front lower arm ball joint |
|
2 |
Front lower arm |
|
3 |
Front lower arm bushing (SeeFront Lower Arm Bushing Removal Note.) (SeeFront Lower Arm Bushing Installation Note.) |
Front Lower Arm Bushing Removal Note
1. Cut off the entire circumference of the knob on front lower arm bushing rear side using a hacksaw as shown in the figure.
CAUTION:
-
When using a hacksaw to cut off the knob on the rear side of the front lower arm bushing, be careful not to scratch or damage the front lower arm.
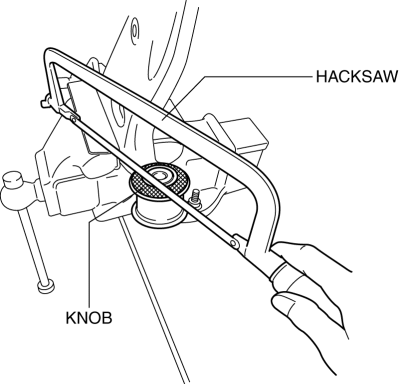
2. Remove the front lower arm bushing using the SSTs
.
CAUTION:
-
Set the SST
(49 U034 204)
as shown in the figure and remove the rear lower arm bushing.
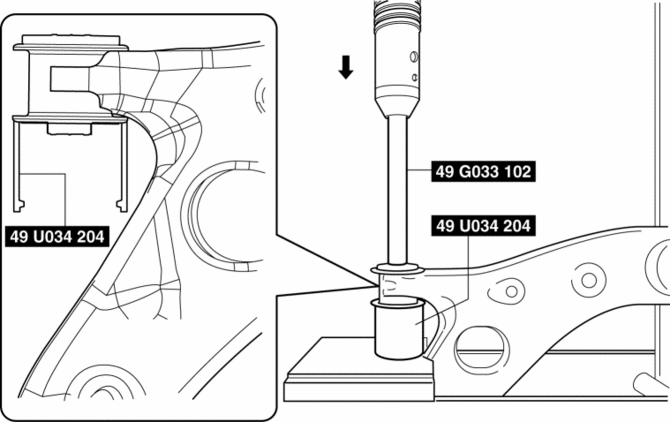
Front Lower Arm Bushing Installation Note
1. Install the front lower arm bushing using the SSTs
.
CAUTION:
-
Set the SST
(49 U034 204)
as shown in the figure and install the rear lower arm bushing.
-
Install the front lower arm bushing so that the projection shown in the figure is pointing toward the front of the vehicle.

NOTE:
-
Applying soapy water to the front lower arm bushing facilitates installation.
-
If soapy water gets in the inner pipe of the front lower arm bushing, always wipe it off using a cloth.
2. After installing the front lower arm bushing, verify that it is installed to the position shown in the figure.
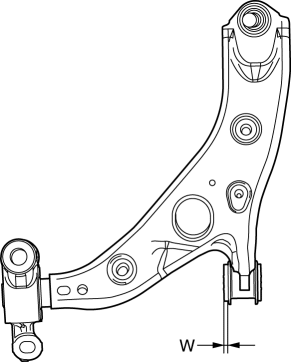
W: 5.8±0.8mm {0.23±0.03 in}
 Front Lower Arm Inspection
1. Remove the front lower arm..
2. Inspect the front lower arm for bending or damage, and the front lower arm
ball joint for excessive looseness.
If there is any malfunction, replace the ...
 Front Shock Absorber And Coil Spring Disassembly/Assembly
WARNING:
Removing/installing the front shock absorber and coil spring is dangerous.
The front shock absorber and coil spring could fly off and cause serious injury
or death, and damage ...
Other materials:
How the SRS Air Bags Work
Your Mazda is equipped with the following types of SRS air bags. SRS air bags
are designed to work together with the seat belts to help to reduce injuries during
an accident.
The SRS air bags are designed to provide further protection for passengers in
addition to the seat belt functions. Be ...
Driveline/Axle SST
Front and Rear Axle
49 T028 3A0
Ball joint puller set
49 T028 301
Dust boot installer
49 U034 204
Dust boot installer
49 W032 310
Support block
—
— ...
Condenser Removal/Installation
1. Disconnect the negative battery cable..
2. Discharge the refrigerant..
3. Remove the front under cover No.1..
4. Drain the engine coolant..
5. Remove the following parts:
a. Plug hole plate.
b. Air cleaner, air hose and fresh air duct component.
c. Coolant reserve tank.
d. Cooling ...
