Mazda CX-5 Service & Repair Manual: Front Drive Shaft Inspection
1. Inspect the connections for any looseness.
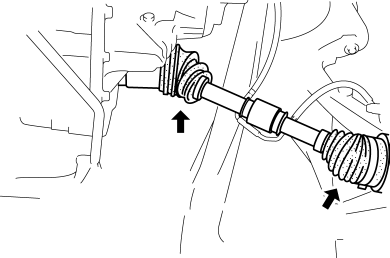
-
If there is any malfunction, tighten or replace the applicable part.
2. Inspect the dust boot for damage and cracks.
-
If there is any malfunction, replace the applicable part.
3. Move the spline and joint up and down, left and right by hand and verify that there is no excessive play.
-
If there is any malfunction, replace the applicable part.
 Front Drive Shaft (Tripod Joint) Disassembly/Assembly
1. Disassemble in the order indicated in the table.
2. Assemble in the reverse order of disassembly.
1
Boot band (transaxle side (large diameter))
(See Boot Band (Tr ...
 Front Drive Shaft Removal/Installation
CAUTION:
Performing the following procedures without first removing the ABS wheel-speed
sensor may possibly cause an open circuit in the wiring harness if it is pulled
by mistake. Before ...
Other materials:
Hazard Warning Switch Removal/Installation
1. Disconnect the negative battery cable..
2. Remove the decoration panel..
3. While pressing the hazard warning switch tab in the direction of the arrow
(1) shown in the figure, press the hazard warning switch in the direction of the
arrow (2) shown in the figure to detach the hazard warnin ...
Driveline/Axle Abbreviations
AAS
Active Adaptive Shift
ABS
Antilock Brake System
ABDC
After Bottom Dead Center
ACC
Accessories
AFS
Adaptive Front Lighting System
ALC
...
Rear End Panel Installation [Panel Replacement]
Symbol Mark
Installation Procedure
1. When installing new parts, measure and adjust the body as necessary to conform
with standard dimensions.
2. Drill holes for the plug welding before installing the new parts.
3. After temporarily installing new parts, make sure the related parts fit p ...
