Mazda CX-5 Service & Repair Manual: Expansion Valve
Purpose
-
The expansion valve atomizes liquid refrigerant to facilitate cooling of the evaporator.
Function
-
The expansion valve reduces the pressure of liquid refrigerant rapidly to facilitate vaporization of the atomized refrigerant at the evaporator, and adjusts the refrigerant amount sent into the evaporator.
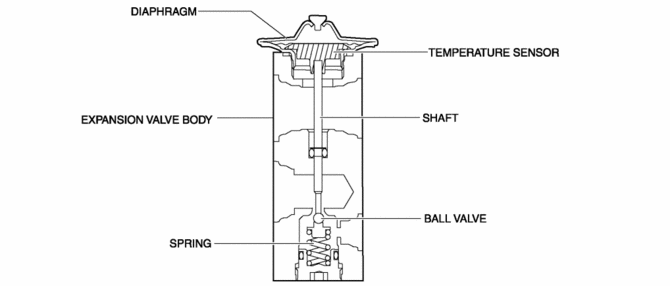
Construction
-
The expansion valve consists of the following parts:
-
Diaphragm
-
Temperature sensor
-
Shaft
-
Expansion valve body
-
Ball valve
-
Spring
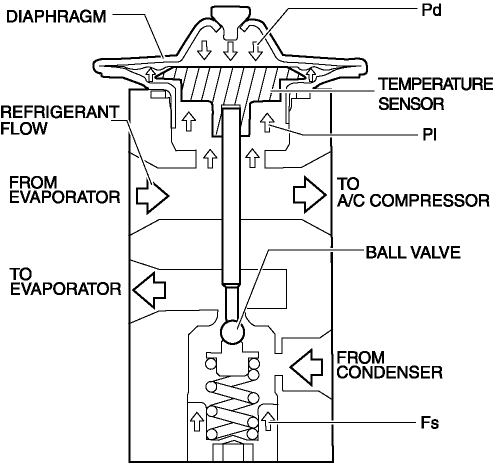
Operation
-
Adjustment of the refrigerant amount supplied to the evaporator is performed by the ball valve opening angle in the expansion valve.
-
The opening angle adjustment is performed according to the balance of the following forces:
-
Refrigerant pressure (Pd) in diaphragm
-
Refrigerant gas pressure (PI) of evaporator under diaphragm
-
Spring force (Fs) pushing up ball valve
-
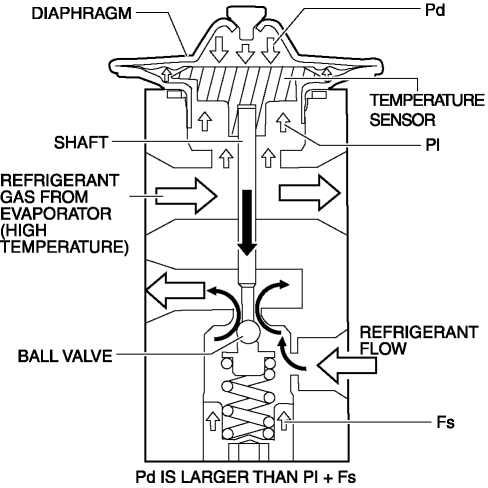
If the refrigerant gas temperature from the evaporator increases, the expansion valve increases the amount of refrigerant according to the following operations:
-
The temperature of the temperature sensor tightly sealed against the diaphragm increases.
-
The refrigerant in the diaphragm warms and the Pd increases.
-
If this Pd increases more than PI + Fs, the diaphragm is pressed down.
-
The shaft installed to the temperature sensor end presses down the ball valve.
-
The amount of refrigerant is increased.
-
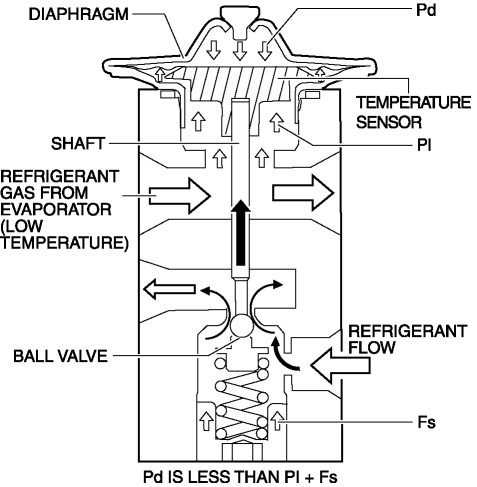
If the refrigerant gas temperature from the evaporator decreases, the expansion valve decreases the amount of refrigerant flow according to the following operation:
-
The temperature of the temperature sensor tightly sealed against the diaphragm decreases.
-
The refrigerant temperature in the diaphragm decreases and the Pd decreases.
-
The Pd decreases less than PI + Fs.
-
The ball valve installed to the temperature sensor end is pressed up.
-
The amount of refrigerant is decreased.
Fail-safe
-
Function not equipped.
 Evaporator Inspection
1. Inspect the evaporator for damage, cracks, and oil leakage.
If there is any malfunction, replace the evaporator.
2. Visually inspect the fins for bending.
If there is any bend ...
 Expansion Valve Removal/Installation
1. Disconnect the negative battery cable..
2. Discharge the refrigerant from the system..
CAUTION:
If moisture or foreign material enters the refrigeration cycle, cooling ability
will b ...
Other materials:
Drive Belt Inspection
Generator Drive Belt
NOTE:
The generator drive belt deflection/tension inspection is not necessary with
the adoption of the drive belt auto tensioner.
1. Verify that the indicator part of the cast hexagon on the drive belt auto
tensioner is within the normal range.
If ...
Rear Lower Arm Removal/Installation
WARNING:
Be careful not to allow the coil spring to fly off when removing/installing
the coil spring. Otherwise, the coil spring could fly off and cause serious
injury or death, or damage to the vehicle.
1. When working on the left side of the vehicle, disconnect the auto lev ...
Power Steering Malfunction Indicator Light
Purpose
The power steering malfunction indicator light warns the driver that there
is a malfunction with the electric power steering (EPS) system.
Function
If there is a malfunction in the EPS system, the power steering malfunction
indicator light illuminates.
If th ...
