Mazda CX-5 Service & Repair Manual: Engine Oil Solenoid Valve Removal/Installation
WARNING:
-
Hot engines and engine oil can cause severe burns. Turn off the engine and wait until it and the engine oil have cooled.
-
A vehicle that is lifted but not securely supported on safety stands is dangerous. It can slip or fall, causing death or serious injury. Never work around or under a lifted vehicle if it is not securely supported on safety stands.
-
Continuous exposure to USED engine oil has caused skin cancer in laboratory mice. Protect your skin by washing with soap and water immediately after working with engine oil.
1. Disconnect the negative battery cable..
2. Remove the front under cover No.2..
3. Remove the splash shield (RH)..
4. Remove in the order indicated in the table.
5. Install in the reverse order of removal.
6. Start the engine and confirm that there is no oil leakage.
-
If there is oil leakage, repair or replace the applicable part.
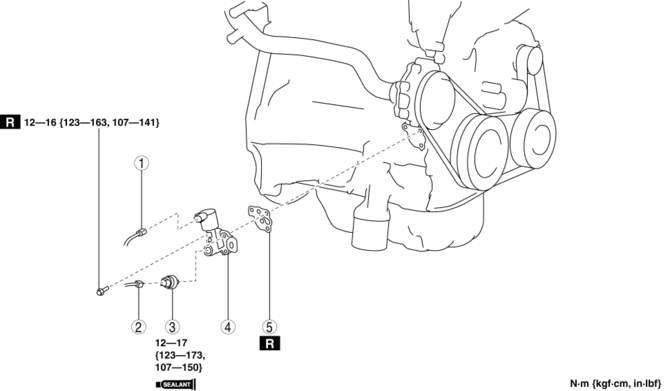
|
1 |
Engine oil solenoid valve connector |
|
2 |
Oil pressure switch connector |
|
3 |
Oil pressure switch (See Oil Pressure Switch Installation Note.) |
|
4 |
Engine oil solenoid valve (See Engine Oil Solenoid Valve Removal Note.) (See Engine Oil Solenoid Valve Installation Note.) |
|
5 |
Gasket |
Engine Oil Solenoid Valve Removal Note
1. Cover the area around the engine oil solenoid valve with a rag because a small amount of engine oil will leak from the engine oil solenoid valve installation area.
CAUTION:
-
Do not let any leaked engine oil to contact the adjacent water pump gasket and O-ring of the water inlet pipe. Otherwise, the gasket could swell causing a seal malfunction.
Engine Oil Solenoid Valve Installation Note
1. After tightening the three bolts shown in the figure, tighten the first tightened bolt to the specified tightening torque again.
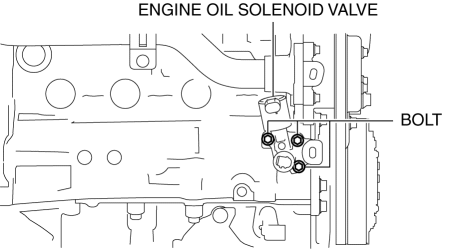
NOTE:
-
The tightening order for the three bolts is optional.
-
Tightening torque
-
12—16 N·m {123—163 kgf·cm, 107—141 in·lbf}
Oil Pressure Switch Installation Note
CAUTION:
-
Be sure there is no sealant between 1.7—2.7 mm {0.07—0.10 in} from the end of the oil pressure switch to prevent a possible operation malfunction.
1. Apply silicone sealant to the oil pressure switch threads as shown in the figure.
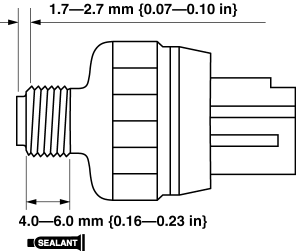
CAUTION:
-
Install the oil pressure switch before the applied sealant starts to harden.
2. Install the oil pressure switch.
-
Tightening torque
-
12—17 N·m {123—173 kgf·cm, 107—150 in·lbf}
 Engine Oil Solenoid Valve Inspection
Engine Oil Solenoid Valve Operation Inspection
1. Remove the engine oil solenoid valve..
2. Verify that the battery is fully charged.
3. Connect the battery to the engine oil solenoid valve conne ...
 Engine Oil Solenoid Valve
Purpose, Function
The engine oil solenoid valve switches the hydraulic transmission passage
in accordance with the driving conditions and the oil pump drive resistance
is reduced by contr ...
Other materials:
Conventional Brake System
Outline
A brake pedal with an intrusion minimizing mechanism has been adopted. As
a result, driver safety has been improved.
A small diameter long-stroke type master cylinder has been adopted, improving
operability and response.
A vacuum pump has been adopted, improving ...
Rear Side Frame Installation [Panel Replacement]
Symbol Mark
Installation Procedure
1. When installing new parts, measure and adjust the body as necessary to conform
with standard dimensions.
2. Drill holes for the plug welding before installing the new parts.
3. After temporarily installing new parts, make sure the related parts fit p ...
Air Intake Control [Full Auto Air Conditioner]
Purpose
The air intake control switches the air intake port (FRESH/REC) according
to the vehicle environment.
Function
The air intake control drives the air intake actuator and switches the air
intake door position according to the operations of the REC, FRESH and defroster ...
