Mazda CX-5 Service & Repair Manual: Electric Power Steering System
Outline
-
A column assist type EPS has been adopted for all models.
-
EPS provides smooth handling from low to high speeds as a result of the excellent steering feel provided by the electronic control and the vehicle-speed responsive control.
-
EPS does not require a power steering oil pump and generates assist force only when the steering wheel is steered. As a result, engine load is lowered and fuel efficiency is improved.
-
Serviceability improved by the automatic configuration function and the steering angle neutral position auto-learning function.
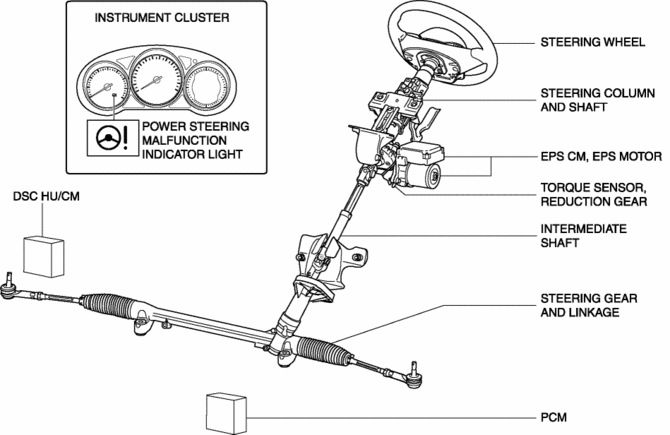
Structural View
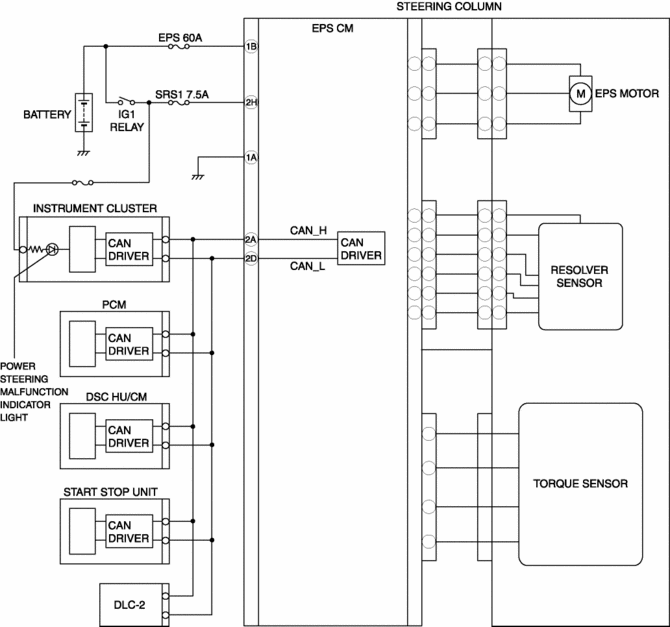
System Wiring Diagram
Purpose/Function
-
The EPS assists the manual steering mechanism operation using the EPS motor to provide supplemental manual power during steering operation, reducing the load on the driver.
Construction
-
The EPS consists of the following parts:
-
Manual steering mechanism
-
Consists of the steering wheel, steering column, steering column and shaft, steering gear and linkage.
-
Electric assist mechanism
-
Consists of the EPS CM (control module) built in the steering column, torque sensor, reduction gear, and EPS motor integrated in the EPS CM.
-
Control system
-
Controls based on the EPS CM, torque sensor, reduction gear, EPS motor, and vehicle speed and engine speed signals input from the PCM.
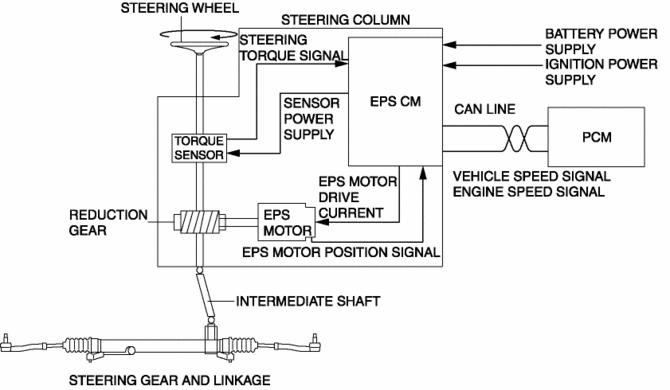
Operation
1. Steering force generated by the driver's steering wheel operation is detected by the torque sensor which is built in the steering column and shaft, and is output to the EPS CM as a steering torque signal.
2. The EPS CM calculates optimum assist force based on the steering torque signal from the torque sensor and the vehicle speed and engine speed signals from the PCM, and outputs electric current to drive the EPS motor.
3. The EPS motor is driven by the current from the EPS CM and the force is transmitted to the intermediate shaft via the reduction gears, thus assisting steering operation of the driver.
 Electric Power Steering (Eps) Motor
Purpose, Function
The EPS motor is driven by the control current from the EPS CM (control module)
and generates assist torque to manual steering mechanism.
Construction
The EPS ...
 Eps Control Module Inspection
1. Remove the driver-side front scuff plate..
2. Remove the driver-side front side trim..
3. Remove the car-navigation unit (with car-navigation system)..
4. Remove the switch panel..
5. Remov ...
Other materials:
Cylinder Head
Outline
With the adoption of the rocker arm (built into needle roller bearing), the
sliding resistance has been reduced.
With the adoption of the HLA, the valve clearance is maintained at 0 mm at
all the times.
The contact point of the rocker arm and cam is lubricated by ...
Rear Body Control Module (Rbcm) Configuration (Using As Built Data)
NOTE:
If the configuration is performed using As-Built data, the set value of the
personalization function is reset to the initial value (condition when shipped
from factory). Verify the set value with the customer and perform the personalization
function setting after performing th ...
Powertrain System [C66 M R]
Purpose, Function
The powertrain mechanism changes the gear combination by engaging or releasing
the clutch hub and gear, and changes the power transmission route. Because of
the change in the power transmission route, the drive force (speed, torque,
rotation direction) input from th ...
