Mazda CX-5 Service & Repair Manual: Electric Power Steering (Eps) Motor
Purpose, Function
-
The EPS motor is driven by the control current from the EPS CM (control module) and generates assist torque to manual steering mechanism.
Construction
-
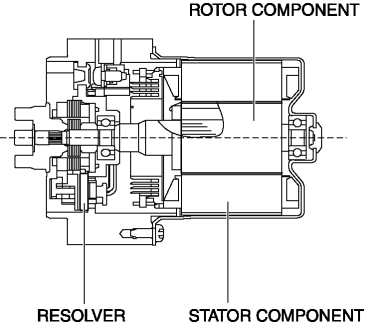
The EPS motor is installed to the steering column with an integrated EPS CM.
-
The EPS motor is a brushless motor which consists of a three-phase star-connected stator, a permanent magnet rotor, and resolver sensor.
Operation
-
Current flows from the EPS CM to the stator to rotate the motor axis which is integrated with the rotor.
-
A resolver sensor for detecting rotation angle is built into the EPS motor and outputs a motor rotation angle signal to the EPS CM.
-
The EPS CM switches the current flowing to each stator based on the rotation angle signal from the resolver sensor.
Fail-safe
|
DTC No. |
Fail-safe function |
|
C200D:1C |
|
|
C200D:64 |
|
|
U2011:19 |
|
|
U2011:1C |
|
|
U2011:62 |
|
|
U2011:72 |
|
|
U2011:92 |
|
 Electric Power Steering (Eps) Control Module
Purpose/ Function
The EPS control module (CM) calculates the optimum assist current based on
the steering torque signal from the torque sensor installed to the steering
column and the veh ...
 Electric Power Steering System
Outline
A column assist type EPS has been adopted for all models.
EPS provides smooth handling from low to high speeds as a result of the excellent
steering feel provided by the elec ...
Other materials:
Cylinder Head
Outline
With the adoption of the rocker arm (built into needle roller bearing), the
sliding resistance has been reduced.
With the adoption of the HLA, the valve clearance is maintained at 0 mm at
all the times.
The contact point of the rocker arm and cam is lubricated by ...
Airflow Mode Actuator [Full Auto Air Conditioner]
Purpose
The airflow mode actuator moves the mode door in the A/C unit to switch the
air vent.
Function
Door open/close function
The airflow mode actuator drives the motor based on the signal from the climate
control unit and moves the mode door to the VENT, BI-LEVEL, HEAT, ...
Auto Leveling Sensor Inspection
1. Disconnect the negative battery cable..
2. Remove the auto leveling sensor..
3. Prepare three dry cell batteries (1.5 V).
4. Connect the three dry cell batteries in a series.
5. Connect the positive pole of the dry cell battery to auto leveling sensor
terminal C, and the negative po ...
