Mazda CX-5 Service & Repair Manual: Drive Plate Removal/Installation [Fw6 A EL, Fw6 Ax EL]
1. Remove the transaxle..
2. Remove in the order indicated in the table.
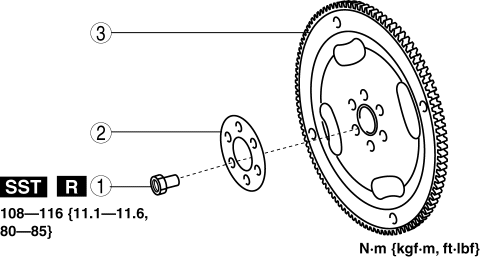
|
1 |
Drive plate installation bolts (See Drive Plate Installation Bolts Removal Note.) (See Drive Plate Installation Bolts Installation Note.) |
|
2 |
Backing plate |
|
3 |
Drive plate |
3. Install in the reverse order of removal.
Drive Plate Installation Bolts Removal Note
1. Set the SST
against the drive plate.
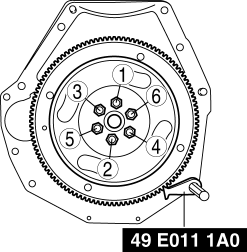
2. Loosen the drive plate installation bolts uniformly in two or three steps in the order shown in the figure, then remove the bolts and the drive plate.
Drive Plate Installation Bolts Installation Note
1. Set the SST
against the drive plate.
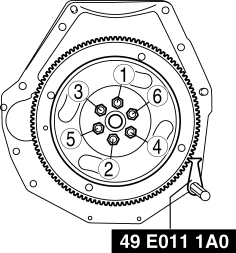
2. Tighten the new drive plate installation bolts uniformly in two or three steps in the order shown in the figure.
-
Tightening torque
-
108—116 N·m {11.1—11.8 kgf·m, 80—85 ft·lbf}
 Down Switch [Fw6 A EL, Fw6 Ax EL]
Purpose/Function
The down switch detects the shift down operation of the selector lever.
The down switch signal is sent to the TCM via CAN and is used for manual
shift control and en ...
 Front Seat Side Cover Removal/Installation
WARNING:
Handling a side air bag improperly can accidentally operate (deploy) the
air bag, which may seriously injure you. Read the service warnings in the Workshop
Manual before handlin ...
Other materials:
Rear End Panel Installation [Panel Replacement]
Symbol Mark
Installation Procedure
1. When installing new parts, measure and adjust the body as necessary to conform
with standard dimensions.
2. Drill holes for the plug welding before installing the new parts.
3. After temporarily installing new parts, make sure the related parts fit p ...
Engine Coolant Replacement
WARNING:
Never remove the cooling system cap or loosen the radiator drain plug while
the engine is running, or when the engine and radiator are hot. Scalding engine
coolant and steam may shoot out and cause serious injury. It may also damage
the engine and cooling system.
Tu ...
Power Outer Mirror System
Outline
Power outer mirrors which can be operated remotely have been adopted.
Structural view
System wiring diagram
Function
Mirror glass adjustment function
Outer mirror glass can be adjusted up/down and left/right electrically.
Operation
Mirror glass adjustmen ...
