Mazda CX-5 Service & Repair Manual: Control Valve Body [Fw6 A EL, Fw6 Ax EL]
Purpose/Function
-
A direct linear solenoid has been adopted for the solenoid valve which contributes to improved shift response, drive feel and reduced shift shock by the improved precision of the hydraulic pressure control.
Construction
-
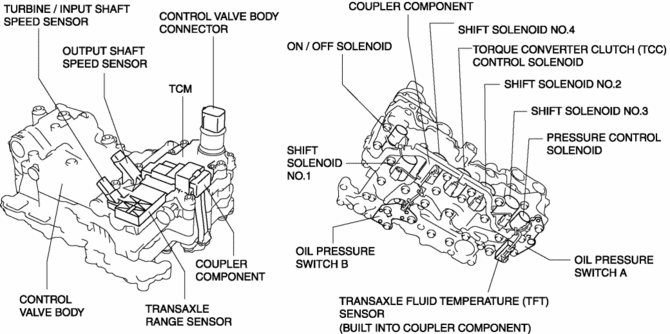
The control valve body consists of integrated hydraulic control related parts and electronic control related parts.
-
The transaxle range sensor, output shaft speed sensor, turbine/input shaft speed sensor, and the control valve body connector are built into the TCM and integrated with the automatic transaxle.
-
The transaxle fluid temperature (TFT) sensor, wiring harness, and the wiring harness cover bracket are built into the coupler component.
-
If any of the component parts of the control valve body has a malfunction, the control valve body must be replaced because the replacement of a single part is not possible except for the following parts:
-
On/off solenoid
-
Oil pressure switch A, oil pressure switch B
-
Coupler component (built into transaxle fluid temperature (TFT) sensor)
 Control Valve Body Removal/Installation [Fw6 A EL, Fw6 Ax EL]
On-Vehicle Removal
WARNING:
A hot transaxle and ATF can cause severe burns. Turn off the engine and wait
until they are cool.
Using compressed air can cause dirt and other particle ...
 Control Valve Body [Fw6 A EL, Fw6 Ax EL]
Purpose/Function
The control valve body controls the hydraulic pressure generated by the oil
pump by each solenoid valve. In addition, the oil passages which introduce hydraulic
pressure ...
Other materials:
Warm Up Three Way Catalytic Converter (Wu Twc) Inspection
CAUTION:
Perform the following procedures, DTC P0421:00 is indicated only.
1. Connect the M-MDS to the DLC-2.
2. Start the engine and warm it up to normal operating temperature.
3. Turn off the engine.
4. Verify that the engine compression is within the specification..
If ...
Check Fuel Cap Warning Light
Purpose/Function
The check fuel cap warning light is built into the instrument cluster.
If the PCM detects that the fuel cap is open, the light illuminates to warn
the driver that the fuel cap is open.
Construction
Built into the instrument cluster.(See INSTRUMENT CLUS ...
Generator Disassembly/Assembly [Skyactiv G 2.0]
CAUTION:
Melt the solder quickly, otherwise the diodes (rectifier) and regulator will
be damaged by excessive heat.
1. Disassemble in the order indicated in the table.
2. Assemble in the reverse order of disassembly.
1
Rotor component
...
