Mazda CX-5 Service & Repair Manual: Clutch Release Cylinder Removal/Installation [C66 M R]
CAUTION:
-
Do not allow clutch fluid to get on a painted surface. Clutch fluid contains properties which can dissolve the paint. If clutch fluid gets on a painted surface, wash it off with water immediately and wipe the area off completely.
1. Remove the front under cover No.2..
2. Disconnect the clutch pipe and hose No.2 from clutch release cylinder, and plug it to avoid clutch fluid leakage..
3. Remove the clutch release cylinder.
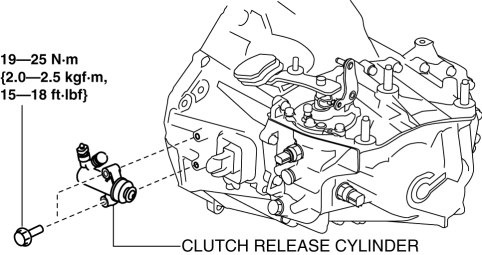
4. Install in the reverse order of removal.
5. Bleed the air from the clutch system..
 Clutch Release Collar Inspection [C66 M R]
CAUTION:
Do not clean the clutch release collar with cleaning fluids or a steam cleaner
because it is filled with grease.
Operation Inspection
1. Turn the collar while applying force ...
 Clutch Unit Removal/Installation [C66 M R]
1. Disconnect the negative battery cable..
2. Remove the MTX..
3. Remove in the order indicated in the table.
4. Install in the reverse order of removal.
5. Add the specified amount of specifi ...
Other materials:
Magnetic Clutch Disassembly/Assembly [Full Auto Air Conditioner]
1. Disassemble in the order indicated in the table.
1
Bolt
(See Bolt Removal/Installation Note.)
2
Pressure plate
3
Shim
(See Shim Installation Note.)
4
Snap ring
(See Snap Ring ...
Sunvisors
When you need a sunvisor, lower it for use in front or swing it to the side.
Side Extension Sunvisors
The visor extender extends the sunvisor's range of sun shading.
To use, pull it out.
CAUTION
When moving the sunvisor, retract the visor extender to its original position.
Otherwise, ...
Seat Belt Precautions
Seat belts help to decrease the possibility of severe injury during accidents
and sudden stops. Mazda recommends that the driver and all passengers always wear
seat belts.
All of the seat belt retractors are designed to keep the lap/shoulder belts out
of the way when not in use.
The driver&# ...
